Navigating Permits
Chapter Contents
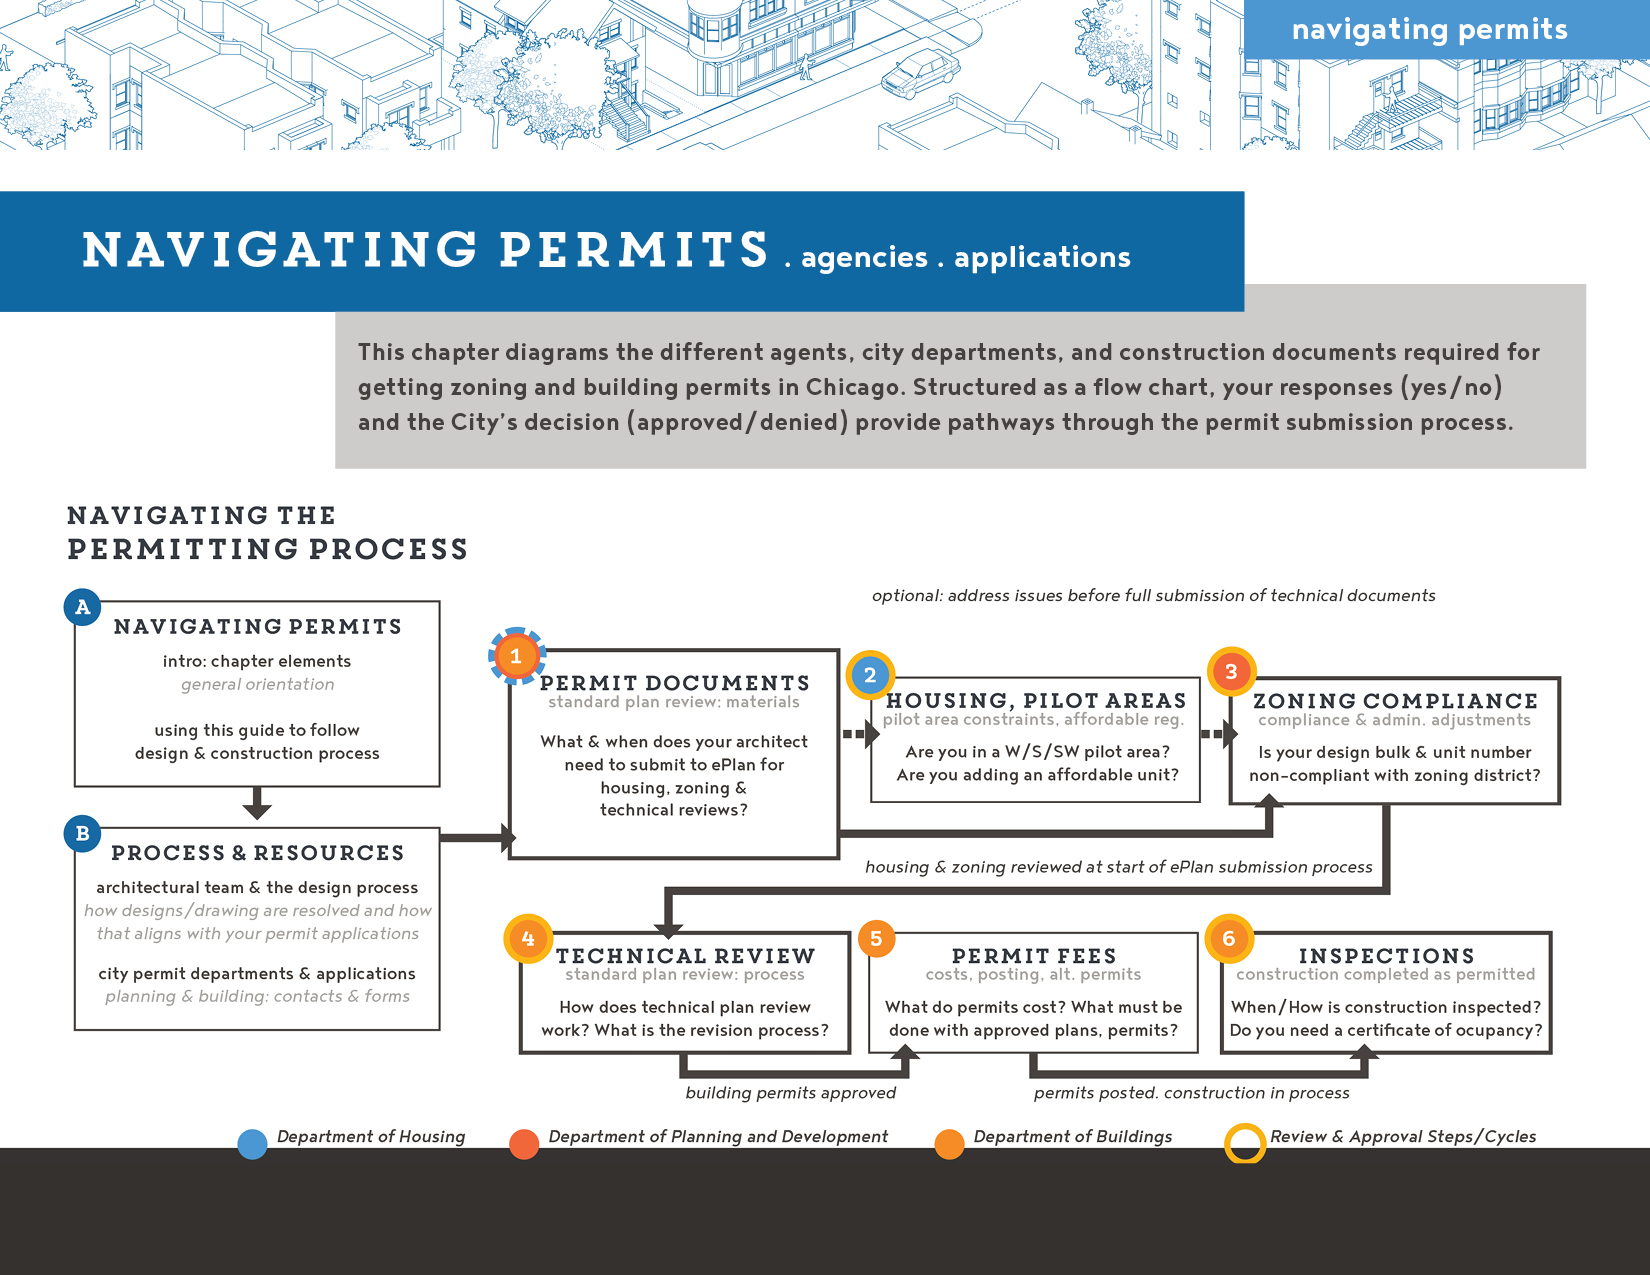
‘Navigating Permits’ introduces the process of applying for housing, zoning, and building permits in Chicago. The core section is composed of a series of diagrams, which outline the typical fees, required forms, applicants (predominantly your architect), city department of application, and common turn-around times. Structured around project questions - ‘does your basement project have a new subgrade terrace?’ - and ‘yes/no’ decision arrows, each diagram maps out a permit pathway, with rejection, revision, and approval cycles. This should enable you to follow your architect and contractor’s progression through the permitting process in ADU pilot areas and citywide:
1 Permit Process - Standard Plan Review Documents:
-
Citywide:
This section lays out the documents required for a ‘Standard Plan Review’ permit submission to the Department of Buildings. It also elaborates on the order of operations between the city’s E-Plan submission process for housing, zoning, and building permit approvals.
2
Housing Review:
- Pilot Areas: These diagrams walk you through applying for a Conversion Certificate and, for those adding multiple ADU’s (5+ unit original buildings), registering affordable units with the Department of Housing.
3 Zoning Review:
- Citywide: These diagrams walk you through ordering a Zoning Compliance Certificate and, as needed, applying to the Department of Planning and Development for minor allowances with an Administrative Adjustment.
Building Review:
- 4 Technical Reviews & Revisions
Citywide: This diagram walks you through the Department of Buildings’ technical review process (architectural, fire, electric, plumbing, geotechnical, etc.) and the sorts of mark-up, revision, and resubmission processes that your architect will lead your design team through.
- 5 Permit Fees & Expedited Processes
Citywide: This section reviews the Department of Buildings’ permit application fee system and the permit posting protocol, so you can anticipate the total costs of a permit application (as estimated by the city). It also elaborates on the Self-Certified Permit application process, where your architect may qualify to ‘self-certify’ the technical plans for your project (and absorb that liability).
6
Construction Inspections:
- Citywide: This final diagram leads you through the City’s required inspections - meant to verify that all building work is done as described in your permits - and reviews the steps required if you fail or miss a required inspection.
This guide is not meant to spur independent applications to Chicago’s Department of Planning and Development or Department of Buildings. Rather, these diagrams help you anticipate the costs, timing, and review cycles involved in obtaining construction permits and completing work to code.
During these stages, your architect should notify you of how technical updates or alternate installation strategies impact your final basement design, the costs for revised drawings, materials and approaches, and the timeline to project completion. As noted in the ‘Building Equity’ chapter, your estimates should include a 10% margin to accommodate the time/labor of drawing revisions and any potential schedule lag, which results from the repair/replacement of failed construction components. (See the 'Introduction,' project steps for your legal recourse facing inept construction work and contractor negligence.)
Before turning to permitting itself, the remainder of this introduction outlines the major city agencies and application forms your architect will work with for certificates and permits.
City Agencies & Applications
design in relation to permits:
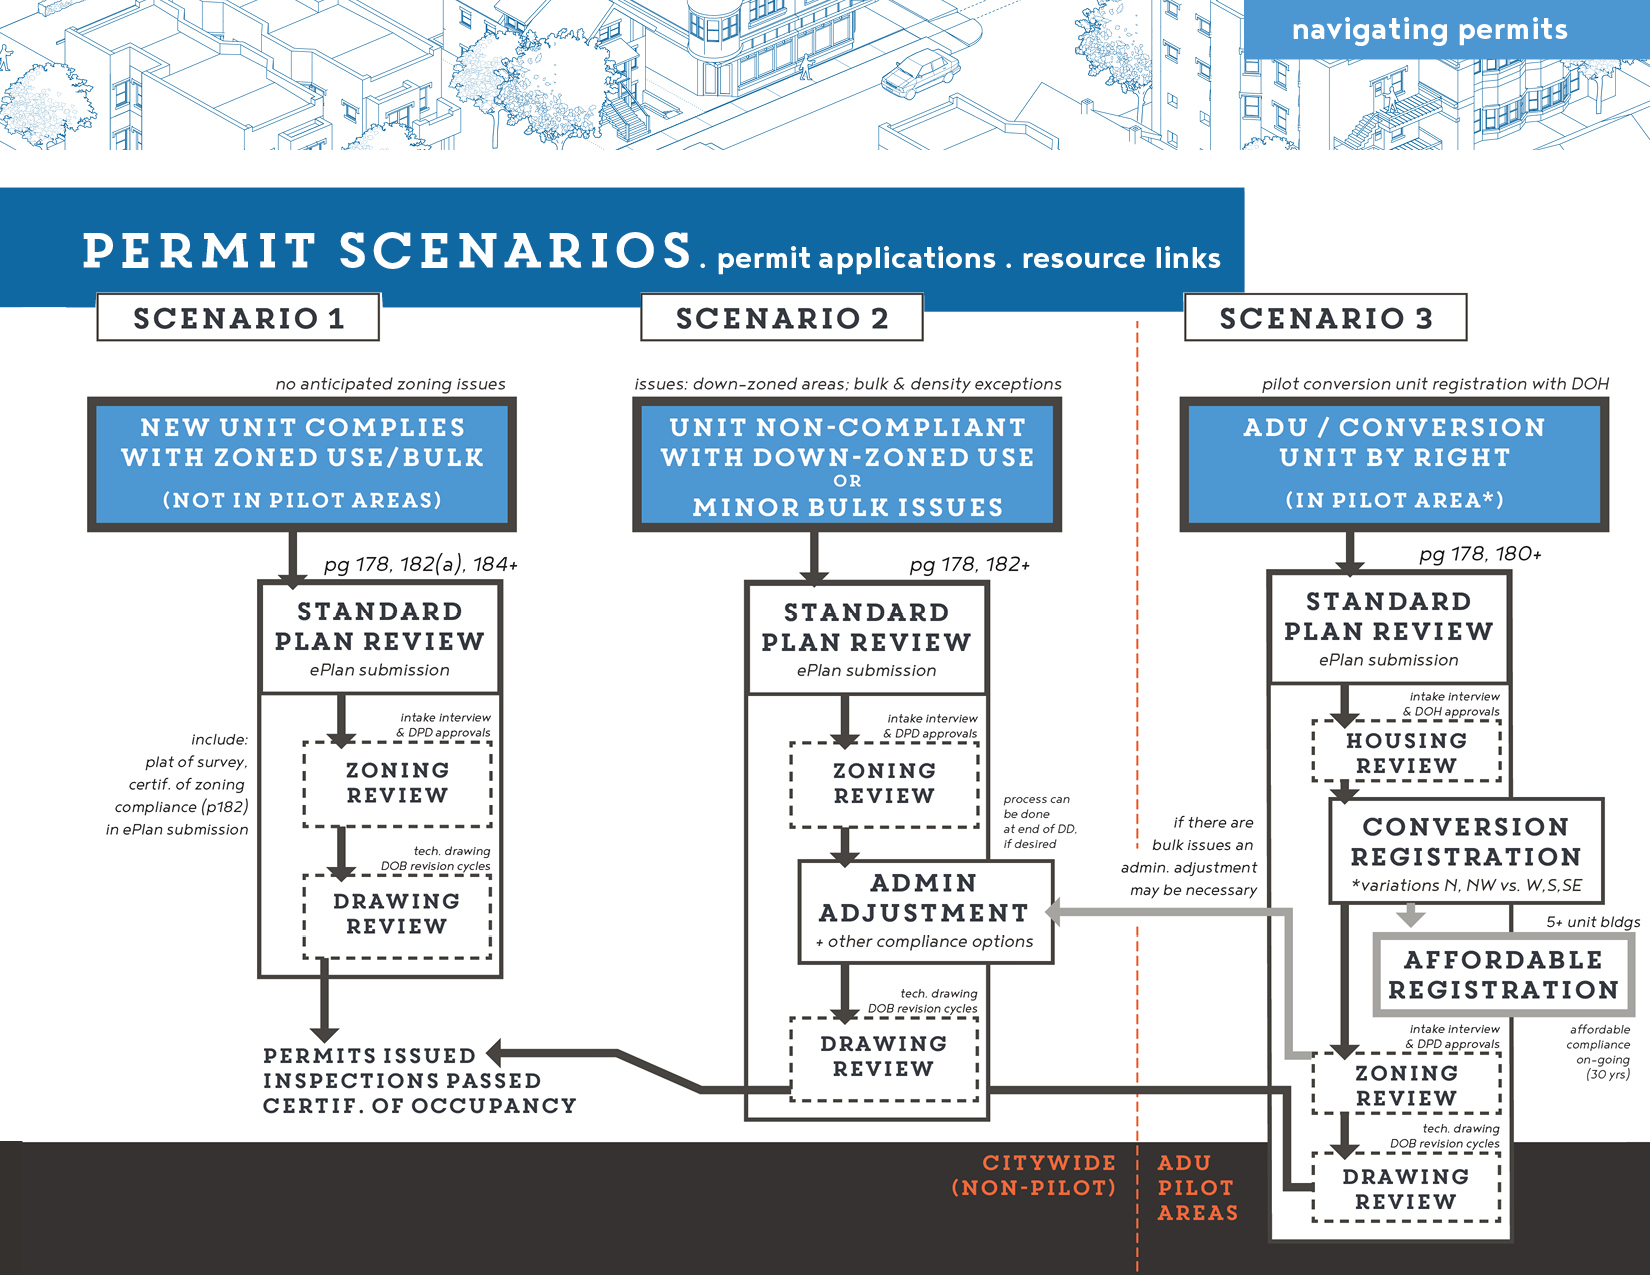
Permit approvals can be spread over time, based on anticipated issues (non-pilot scenarios 2, right) or condensed into a single submission (default approach). Their sequence - moving from general building character to technical details - parallels the design process. Inspections enforce permitted work, confirming alignment of constructions and design.
Key design stages, for permits and inspections, include:
-
Design Development (DD),
provides general plans for admin. adjustments (advanced DPD submissions in scenario 2, opt.).
-
Construction Documentation (CD),
consists of producing a full set of construction document, submitted to standard plan review and revisions (all scenarios; with sequential review by DOH, then DPD before review by DOB).
-
Construction or Construction Administration (CA),
your contractor will direct construction and schedule inspections. Your architect can be contracted to monitor work and provide revised plans/permits. (all scenarios)
Your architect, who will lead you through design and permitting, needs to be an Architect of Record (AOR). This means they are licensed in Illinois to stamp construction drawings as legal, binding documents, directing your basement conversion. Your architect of record will consult with engineers (structural, electric, etc.) for system calculations and may manage the bidding process. During construction, additional drawings and design revision are typically done under separate contracts (with additional fees).
city offices & contacts:
The process of applying for permits is consolidated in the City’s use of the E-Plan application system. Depending on reviews and revisions, you and your architect may meet with a) the Department of Planning and Development, b) the Department of Buildings, and c) the Department of Housing, if you are in an ADU pilot area (scenario 3). See next column for common forms, resources, and contacts.
doh - dept. of housing
ADU pilot Housing Reviews
physical location: Rm 1006, City Hall
general contact: (312) 744-4190, submissions questions & directions
dpd - dept. of planning & Development
Zoning Reviews
physical location: Rm 905, City Hall
general contact: (312) 744-5777, submissions questions & directions
dob - department of buildings
Technical reviews, construction permits, construction inspection:
physical location: Rm 900, City Hall
general contact: (312) 744-3449, submissions questions & directions
permit process:
standard plan submission
construction permit options:
If you visit the Department of Buildings’ website, you’ll notice that there are a number of permit options. This guide follows the ‘Standard Plan Review’ because it’s the most common process, given the scale of work required for a basement conversion.
The other option you might pursue, based on your architect’s qualifications, is the Self-Certified Permit process, elaborated after fees. In this route, your designer qualifies with the city and assumes responsibility for all technical reviews. This has the benefit of streamlining the review process, saving time and money during permitting itself. The potential downside is that if you are unhappy with your architect’s work or their construction administration, the major city oversight occurs during inspections. If your design team can correct an error on paper it will save you the cost of materials, labor, and re-inspection fees/fines that required for site-based corrections.
During schematic design, your architect should search the Dept. of Buildings’ violation data to determine likely renovation issues; they should double check and help you resolve these issues before beginning the permit application. Violations, debt, and liens will disqualify your application from review under either system.
standard plan review docs:
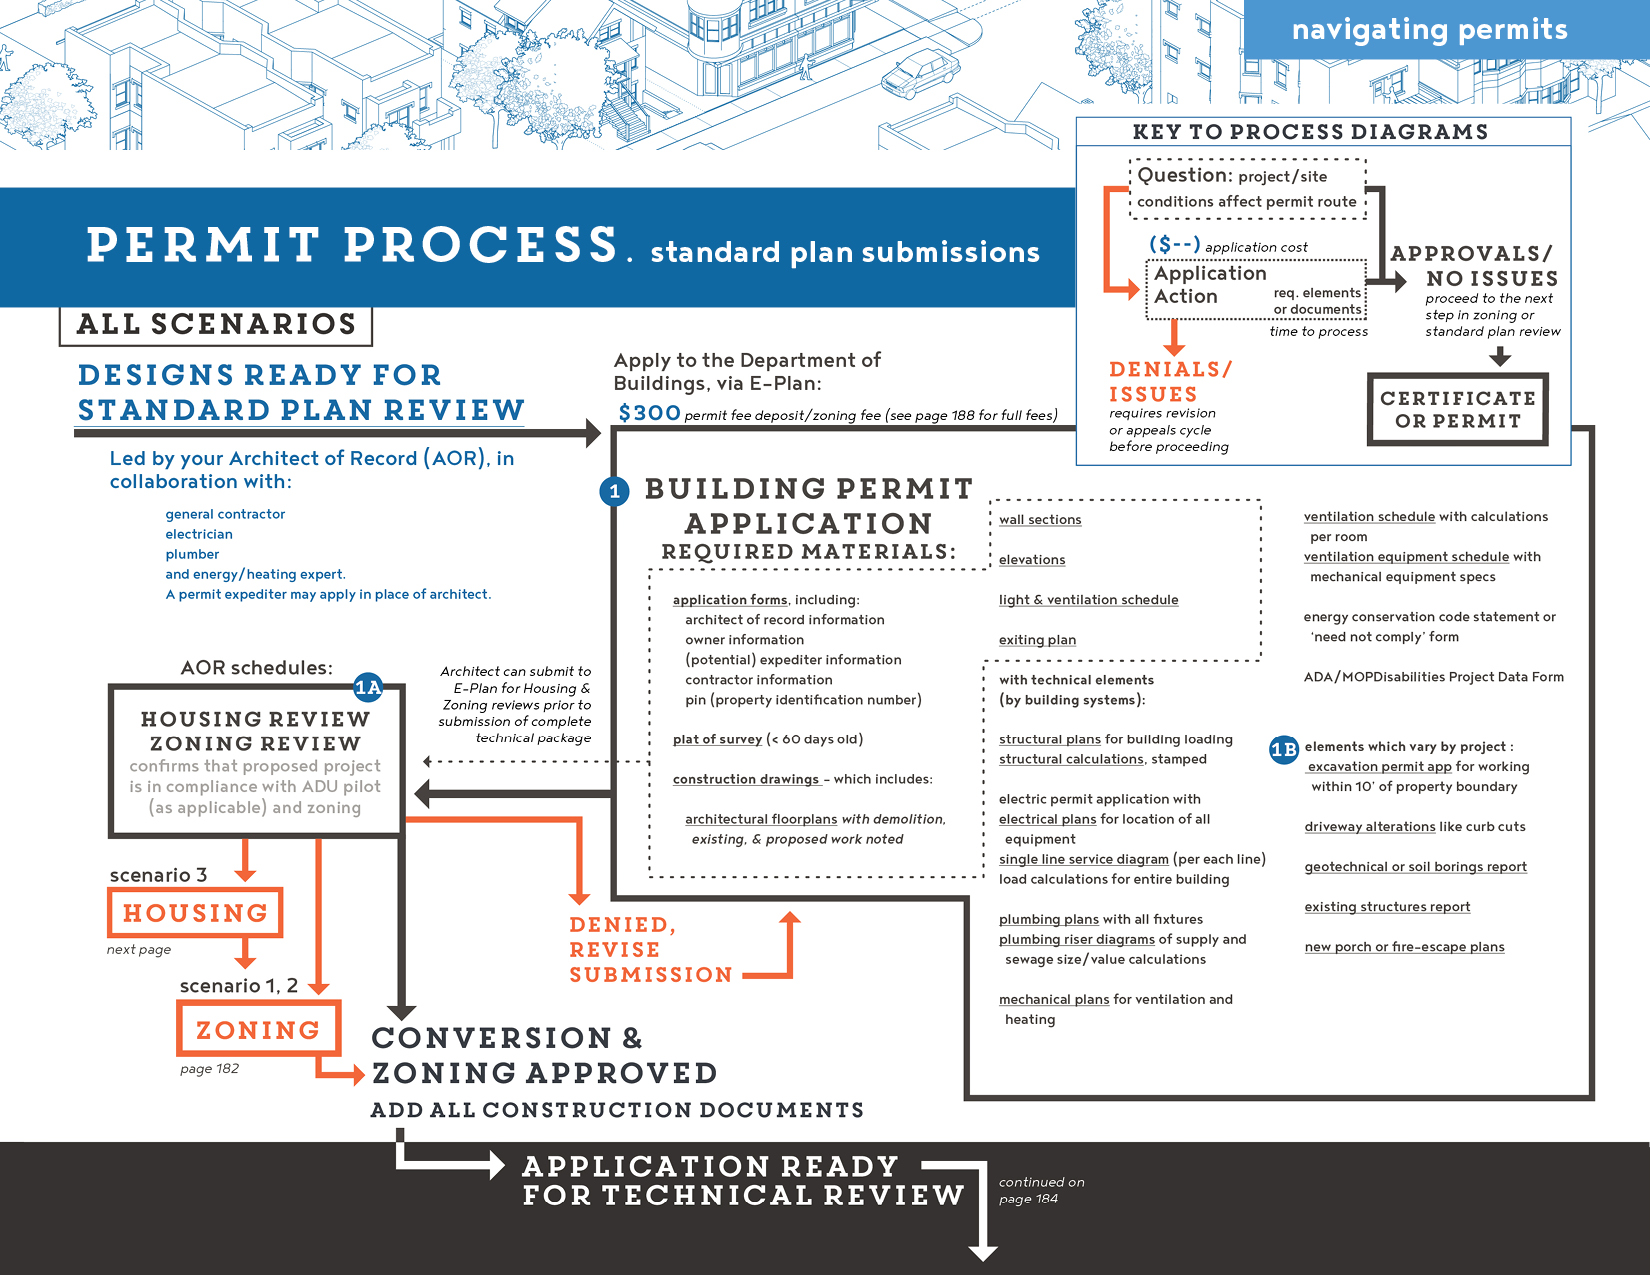
Whether you pursue standard plan review or self-certification, your architect will be responsible for creating an E-Plan account for the digital collation and coordination of drawing submissions and revisions. As discussed in the introduction, this must be done by a licensed architect, engineer, or permit expediter. Once your architect has created an account, within 24 hrs, they will be notified to pay the zoning permit fee ($300) and begin the upload process.
1 The Standard Plan Review Documents, broadly speaking, include drawings and calculations that mirror the sections discussed in ‘Code Compliant Units’. This is because the permitting process is designed to verify the detailing and design of buildings to protect public health, safety, and general welfare. Download the City’s Standard Plan Review Checklist for a full drawing list, in order to check off items when reviewing design documents with your architect.
1a Your architect can initiate the housing (pilots) and zoning review process after uploading a) the application forms themselves and b) the architectural drawings - floorplans, site plans, sections, elevations, details, and egress/fire safety plans - in advance of full upload of technical systems. These materials are copied to, first, the Department of Housing and, then, the Department of Planning and Development for review and an approval appointments. This allows the architecural team to continue compiling/upload technical elements - like electric, plumbing, etc.. Your architect may simply submit the full packet, go through applicable DOH and DPD approval (addressed in scenario 2, 3), and then progress to the technical plan review process. (See steps here.)
1b Most of the required documents, at left, will be familiar from earlier sections. To clarify, there are a few new items you may not anticipate, in bullets below, as well as some specialized drawings that will not be required for your submission. Of the elements listed by the city, you are unlikely to need:
- refrigeration / food prep plans (for commercial spaces)
- landscape ordinance elements (commercial/parking lots)
- storm-water management plans (typically larger lots)
You may need to confirm the following additions:
- ADA/MODP data form (explaining accessibility /residential exemptions)
- Energy Conservation Compliance plans (for heating, insulation, and energy use, from heating/environmental specialist)
- porches and below-grade areaways (if adding egress routes)
- site elements like driveway cuts (for review in zoning approval)
- and background structural and geotechnical reports.
housing reviews:
adu pilot areas & affordability requirements
housing applications, timing:
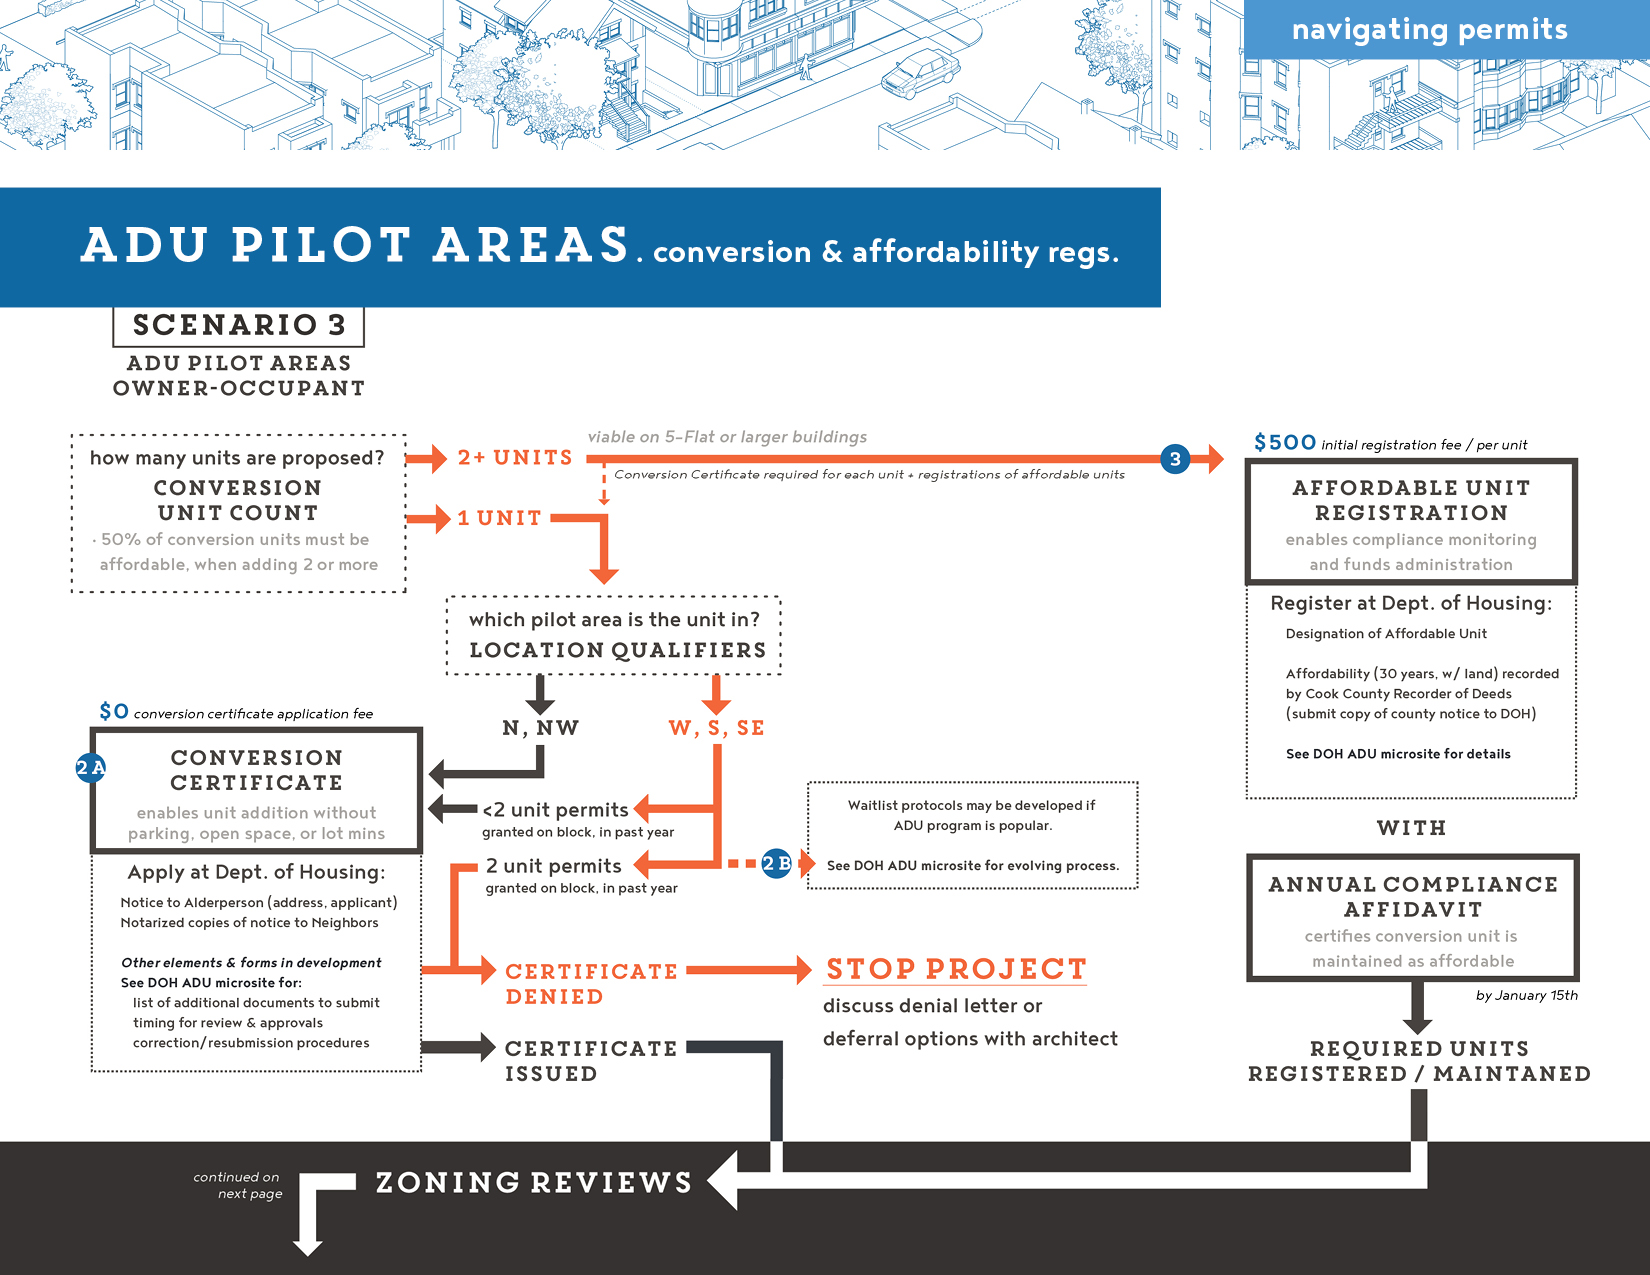
The ‘Additional Dwelling Units Ordinance’ requires that owners in pilot areas obtain a ‘Conversion Certificate’ from the Department of Housing (DOH) for basement conversion units, before they can qualify for building permits. Buildings adding multiple conversion units must also register their affordable unit (i.e. 60% AMI as discussed in ‘Building Equity’) in advance of receiving building permits.
Currently, DOH is finalizing application procedures for the ADU pilot areas. In 2024, DOH will report on the pilots and may revise qualifications. The graphic at right and the following summary are for general orientation only. The most reliable source of information is the Department of Housing website and the dedicated ADU microsite.
For those applying for ‘Conversion Certificates,’ housing reviews will be the first step in a Standard Plan Review, during the submission of a full ePlan package.Applications to the Department of Housing are relatively inexpensive ($0 for conversion, $500 per affordable unit). See the ADU microsite for the updated list of ‘Conversion Certificate’ forms and documents. Affordable units are not required in buildings orginally containing from one to four flats. Given typical readership, the affordable registration requirements are thus provided for exception cases.
2 conversion certificate, in pilot areas
If you are in a pilot area zoned RS-2 or higher and do not have a carriage house, you can add a conversion (basement) unit by right (see pilot areas, on the Zoning Map). All new conversion units must have accompanying ‘Conversion Certificates.’ The certificate flags your project, so that when the Department of Planning and Development reviews the density, parking, and open space proposed, they seek alignment with ADU allowances. While application forms and checklists are still being developed, there are three main elements required:
- 2a As a homeowner, you will need to inform your neighbors (within 100’) and alderman and attach certified notice copies to your Conversion Certificate application. The background application may include preliminary design drawings and will use address to confirm participation in ADU pilot program and, in the zones below, confirm compliance with anti-gentrification controls.
- 2b Pilot Zones W/S/SE: All conversion units must be in an owner-occupied building, if building has three or fewer uits.
- 2b Pilot Zones W/S/SE: No more than two conversion units can be permitted on the same block, both sides of the street, within the same year. As of now, permits will be issued on a first-come, first-served basis. If the ADU program is popular, DOH may develop a lottery system for applicants.
If your ‘Conversion Certificate’ is approved, you may still have minor zoning issues based on design/bulk reqs. Your architect and DPD will advise on how to meet outstanding zoning issues before your project goes to technical review. If denied for reasons other than the W/S/SE block restrictions, your architect should advise on project viability in general.
3 affordable registration,
in pilot areas
For buildings with five units in the ADU pilot areas, it is possible to add two conversion units, of which one conversion must be affordable. This unit must be keep affordable for 30 years (no matter the owner) and the owner must notify the Cook County Recorder to note the affordable unit on their deed. Copies of this notice, documents identifying the specific unit, contact information, and a $500 fee (for admin.) are required when registering the unit with the Department of Housing. After permitting and construction, an annual affidavit is required to maintain registration. See ADU microsite for registration details.
Zoning Review
Certificates of Compliance & Administrative Adjustments:
zoning certificates, timing:
Broadly speaking, you can pursue zoning approvals after design development, to avoid delays, or as an initial step in the Standard Plan Review process. The most common applications to the Department of Planning and Development including certificates of compliance, denial appeals, or administrative adjustments. They are relatively inexpensive ($100-$500) and have roughly two week turn-around times. The documents needed - a plat of survey, preliminary design drawings - coincide with what your architect should be commissioning/creating in schematic and design development phases.
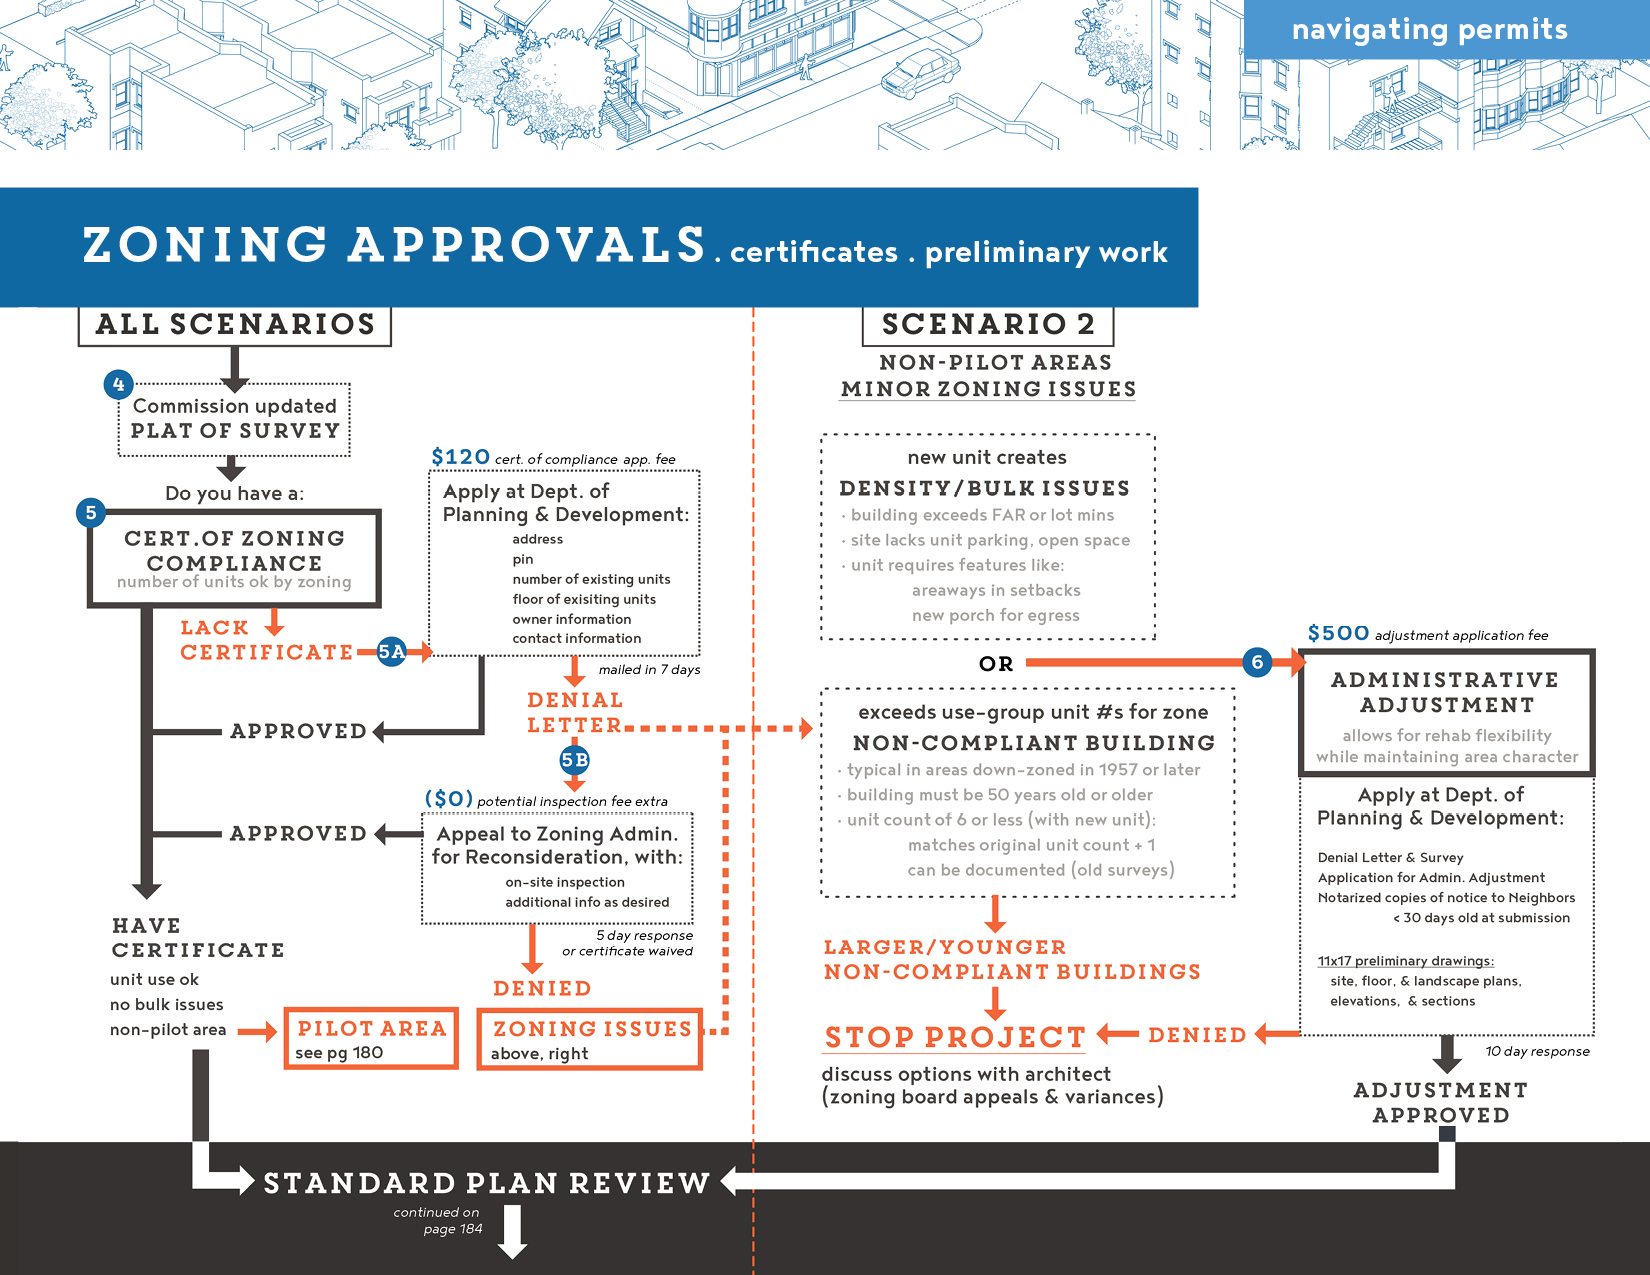
All applicants for building permits will need a plat of survey and their certificate of zoning compliance for submission with Standard Plan Review (scenario 1). Owner-occupants who lack a certificate of compliance or are seeking some flexibility in zoning allowances will likely need an administrative adjustment (scenario 2). For instance, single family houses may add a unit in RS-3 areas outside the ADU pilots, to become a Two-Flat. But smaller lots will require flexibility on areaways for egress, lower lot area minimums/unit, and/or reduced open space.
zoning compliance . all scenarios
4
As you start the design process, you should contract with a surveyor for an updated plat of survey. This document lays out the legal dimension of your lot and building position; a copy will be required for all building permit submissions (all permit scenarios).
5 You should dig out your certificate of zoning compliance, received when purchasing your building. The certificate states the number of residential dwelling units at the property that are legal under the Chicago Zoning Ordinance.
- 5a If you do not have a certificate of compliance, you can order one from the Department of Planning and Development (forms and requirements here). Be forewarned, just because you have a Two-Flat in good condition does not mean you’re compliant; much of the city has been down-zoned over recent years.
- Compliance appeals are free and enable you to add additional context and review your property with the zoning administrator.
- 5b Even if you know you’re non-compliant, you need to apply so you can use the denial letter in other zoning applications.
zoning adjustment . scenario 2
6 If you are non-compliant by use or have new unit features that conflict with density/bulk standards of your zone - you’ll need an administrative adjustment to get permits for your basement unit. An administrative adjustment is for minor modifications, like increasing floor area ratios, allowing elements that exceed lot offsets, or, for older buildings, confirming that the number of units were legal at the time of construction (50+ years ago).
- For basement work, you are likely to have details - subgrade terraces (within your front offset) or new porches for egress - that require an adjustment. Work with your architect to confirm these elements/issues, as they will provide annotated drawings and submit, on your behalf, the administrative adjustment application (forms and checklist here).
- As a homeowner, you will need to inform your neighbors (within 100’) and alderman of your proposed zoning adjustment and attach certified notice copies to your adjustment application.
- This notice requirement parallels that of Conversion Certificates for ADU pilots (scenario 3, last section). If you are in a pilot zone and still anticipate bulk issues, you should prepare and submit notices within the Standard Plan Review process, for DOH and DPD review.
Once your adjustment is approved (in advanced or during Standard Plan Review), your project is eligible for technical review and construction permits (under 'Building Review').
If you are non-compliant and are denied an adjustment, talk with your architect about options. There are more intense procedures for changing your zoning allowances which require community hearings, and legal representation. See this guide, by the Community Law Association, for details and other zoning resources.
building reviews:
technical reviews for standard plan permits
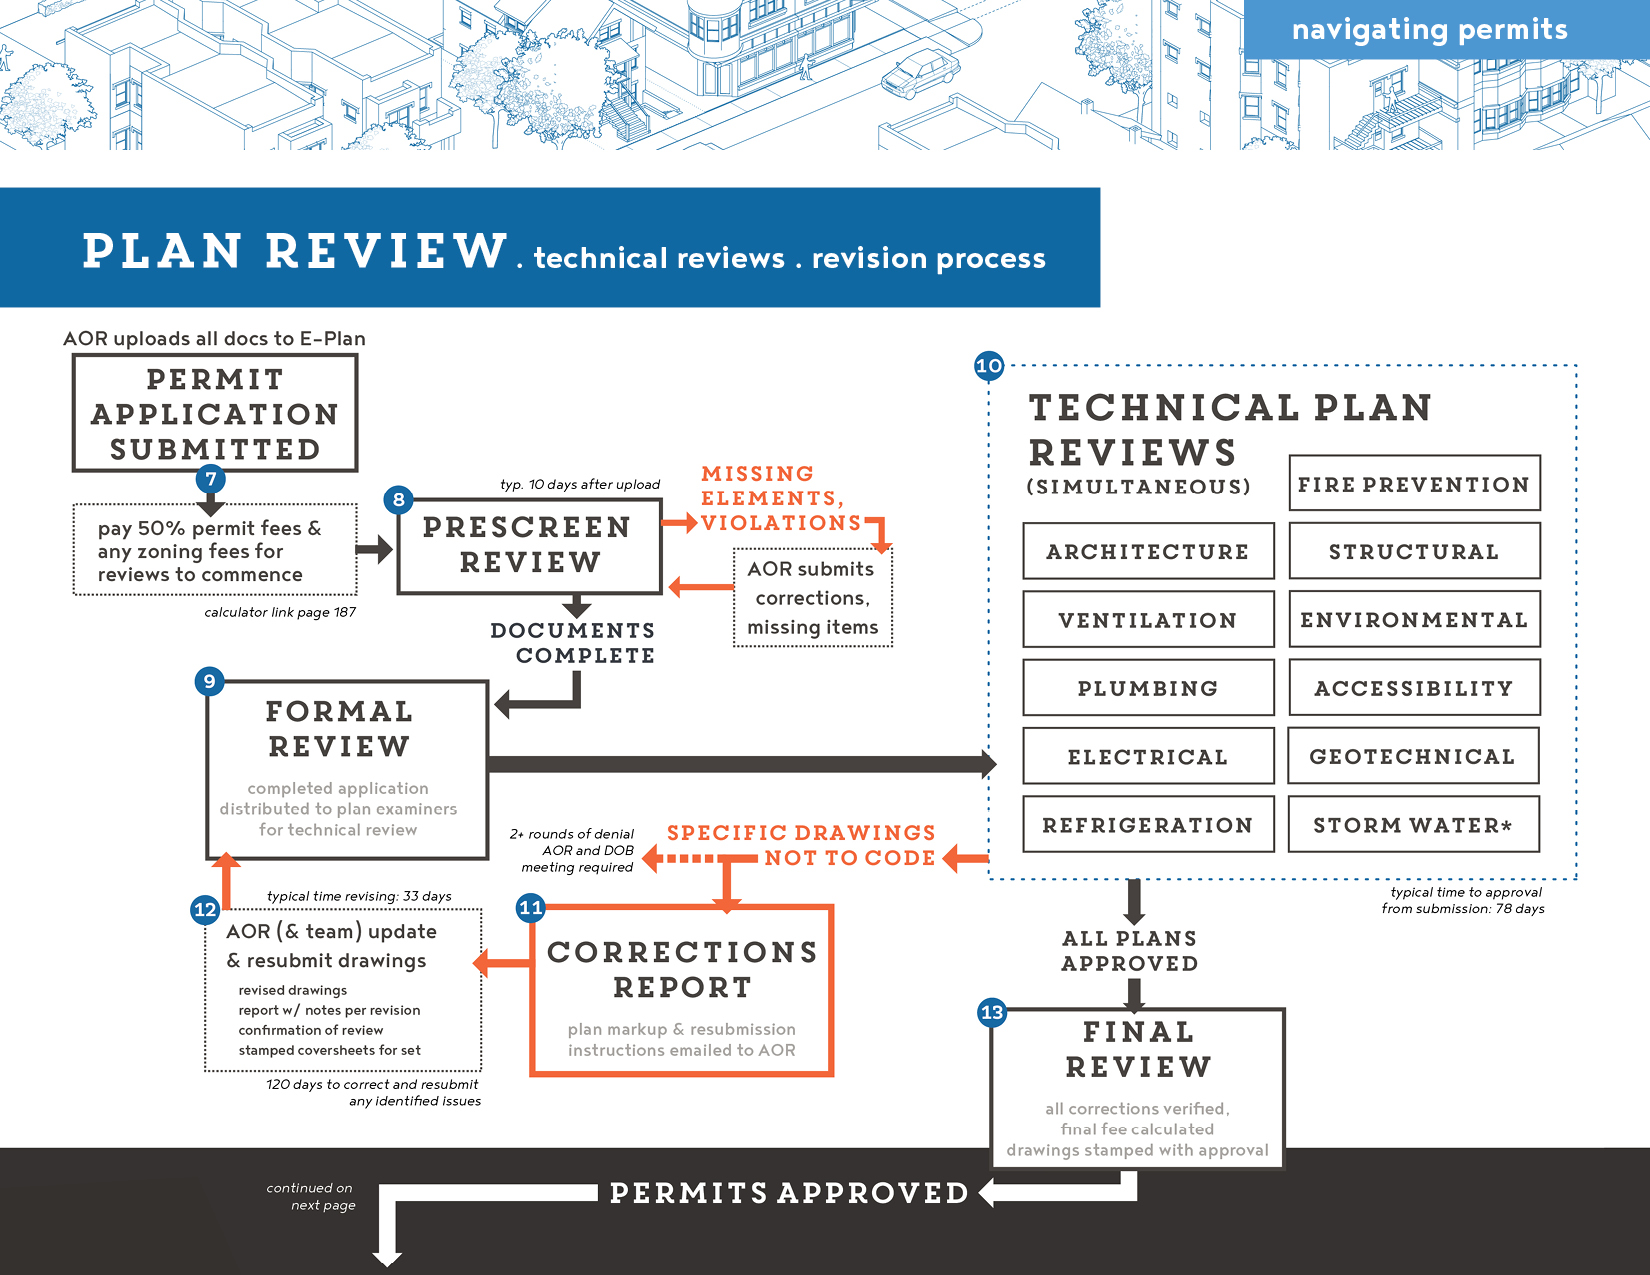
7 The Department of Buildings’ permit review process, on the city side, is coordinated by an assigned project manager (PM), who communicates to your architect (AOR) all decisions, revisions, and approvals. Once all documents have been submitted to E-Plan and your zoning review is done, you’ll need to pay prorated fees (50% of your overall permit costs, as calculated next page) to initiate the technical review process.
8 The PM commences permit review, in the first 10 days, with a ‘Prescreening Review’ of your application. This includes confirming that all of the required documents are complete and checking for any outstanding issues with your building, such as debts, violations, and unpaid fees or fines. If anything is found in prescreening, the PM will notify your architect and provide a list of elements to resolve. Throughout the design and review process, a conscientious architect will try to anticipate and resolve issues in advance of warnings, notices, or bureaucratic review cycles.
9 After prescreening is complete and all permit documents are in order, the PM will then distribute the submitted drawing set for Formal Review, to engineers, inspectors, and licensed tradespeople within the Dept. of Buildings. This allows for detailed, technical inspection of the proposed project, from ventilation calculations to egress routes.
- 10 Each technical reviewer, as listed at right, will mark-up plans, in red, to identify areas that lack detail or are in violation of Chicago’s construction codes. They will also provide short notes, describing each highlighted omission or defect.
- 11 The PM then compiles their highlights into a ‘Correction Report’ for your architect (and their subconsultant team). The PM should notify your architect, via email, when this is ready, or, in a best-case scenario, when all submitted plans are approved. It is always possible to check on the review process - which technical reviews are complete, which are in process - through the E-Plan system; your designer should keep you apprised of this status.
Once your architect has the 12 Corrections Report, they should inform you of a) the general revisions required and their anticipated timeline for drawing resubmission. Independently, they should coordinate with their consultants (engineers, etc.) to execute the required changes. (The following spread includes samples from this revision process so that you can visually track how revisions appear.)
If your architect shows you revisions, you’ll note that the edited drawing areas are circled by cloud-like bubbles with keyed explanations. This is the standard, required revision structure. Once all revisions are made, your architect will collate the drawings, add those keyed responses to the Corrections Report and resubmit the drawing-set, with a new set of stamped cover letters, certifying their legal review and revision of all materials. This will be checked by the PM and once again distributed for technical plan reviews. Your architect will invoice you for the time involved in drawing revisions.
On average, a design team takes 33 days to revise and resubmit a document set in the City of Chicago. Depending on your overall project schedule, the type and scale of required alterations and the building systems they affect, your architect may allot more or less time for revision cycles. Generally the first two rounds of technical review can be done entirely through the E-Plan platform. Any architect that is facing a third round of revisions is required to have an in-person interview at the Department of Buildings, in as much as their revisions are not adequately addressing the need for safe, code-compliant construction.
13 Once your architect’s revised drawing set has been reviewed and approved, the PM will collate the drawing set and stamp it as approved with the official City/Dept. of Buildings’ seal. Once again the PM confirms there are no outstanding debts or violations. They calculate the permit fees, based on your review and resubmission process, and notify your architect a) of those costs and b) that the stamped, approved drawings are ready for distribution (bids and construction site copies).
Drawing Revisions
visual samples
During the review process, your architect is not likely to show you the full CD drawing set, which can be extensive. Instead, they will most likely walk you through specific changes. To aide in following those select updates, the schematic samples at right provide a snapshot of how a typical drawing will be annotated with a) revision mark-up, by the Department of Buildings’ technical experts, and b) revised details, from your architect and design team.
For additional details on plan review and revisions, see the city’s guide (for architects) on navigating the E-Plan interface and revision submission processes.
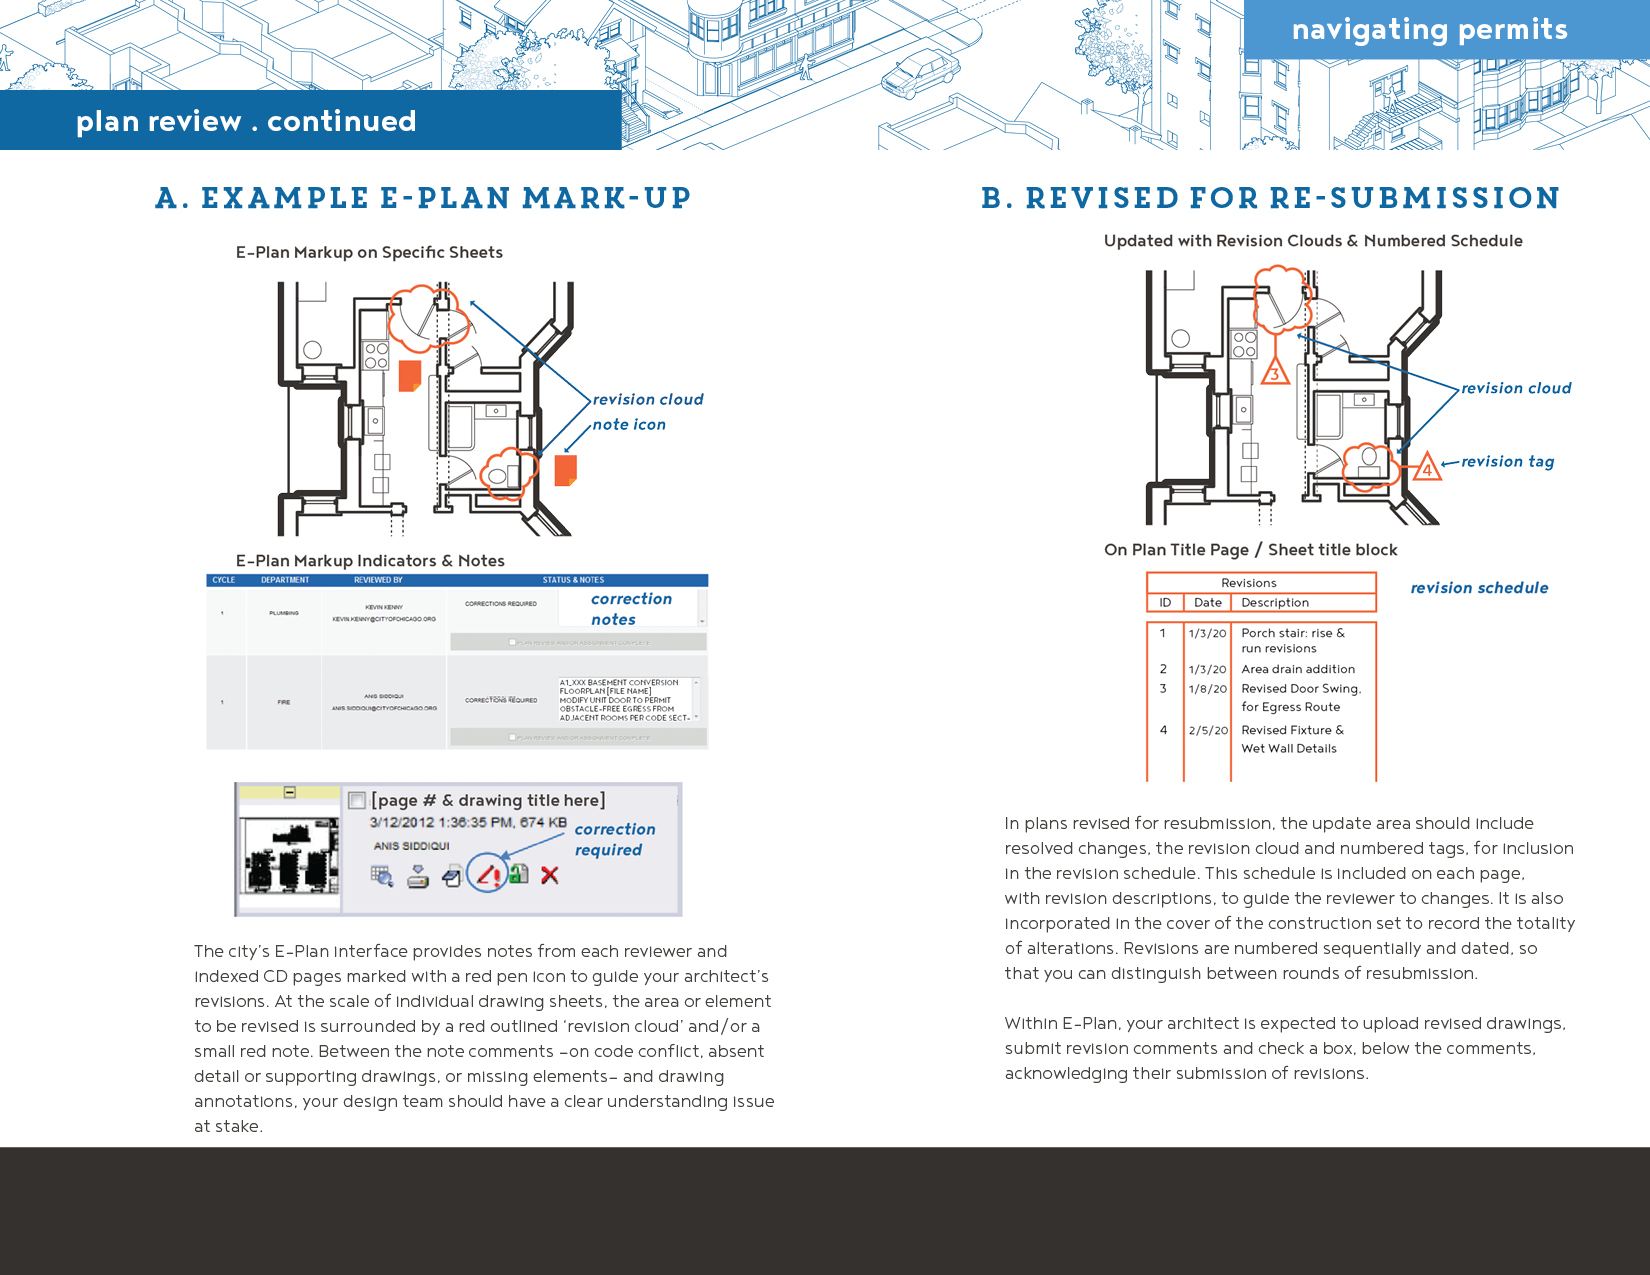
a. example e-Plan mark-up
drawings captions: The city’s E-Plan interface provides notes from each reviewer and indexed CD pages marked with a red pen icon to guide your architect’s revisions. At the scale of individual drawing sheets, the element to be revised is surrounded by a red outlined ‘revision cloud’ and/or a small red note. Between the note comments —on code conflict, absent detail or supporting drawings, or missing elements— and drawing annotations, your design team should understand the issues at stake.
b. revised for re-submission
drawings captions:In plans revised for resubmission, the update area should include resolved changes, the revision cloud and numbered tags, for inclusion in the revision schedule. This schedule is included on each page, with revision descriptions, to guide the reviewer to changes. It is also incorporated in the cover of the construction set to record the totality of alterations. Revisions are numbered sequentially and dated, so that you can distinguish between rounds of resubmission.
Within E-Plan, your architect is expected to upload revised drawings, submit revision comments and check a box, acknowledging their submission of revisions.
Permit Fees & Expedited Processes
calculating permit costs:
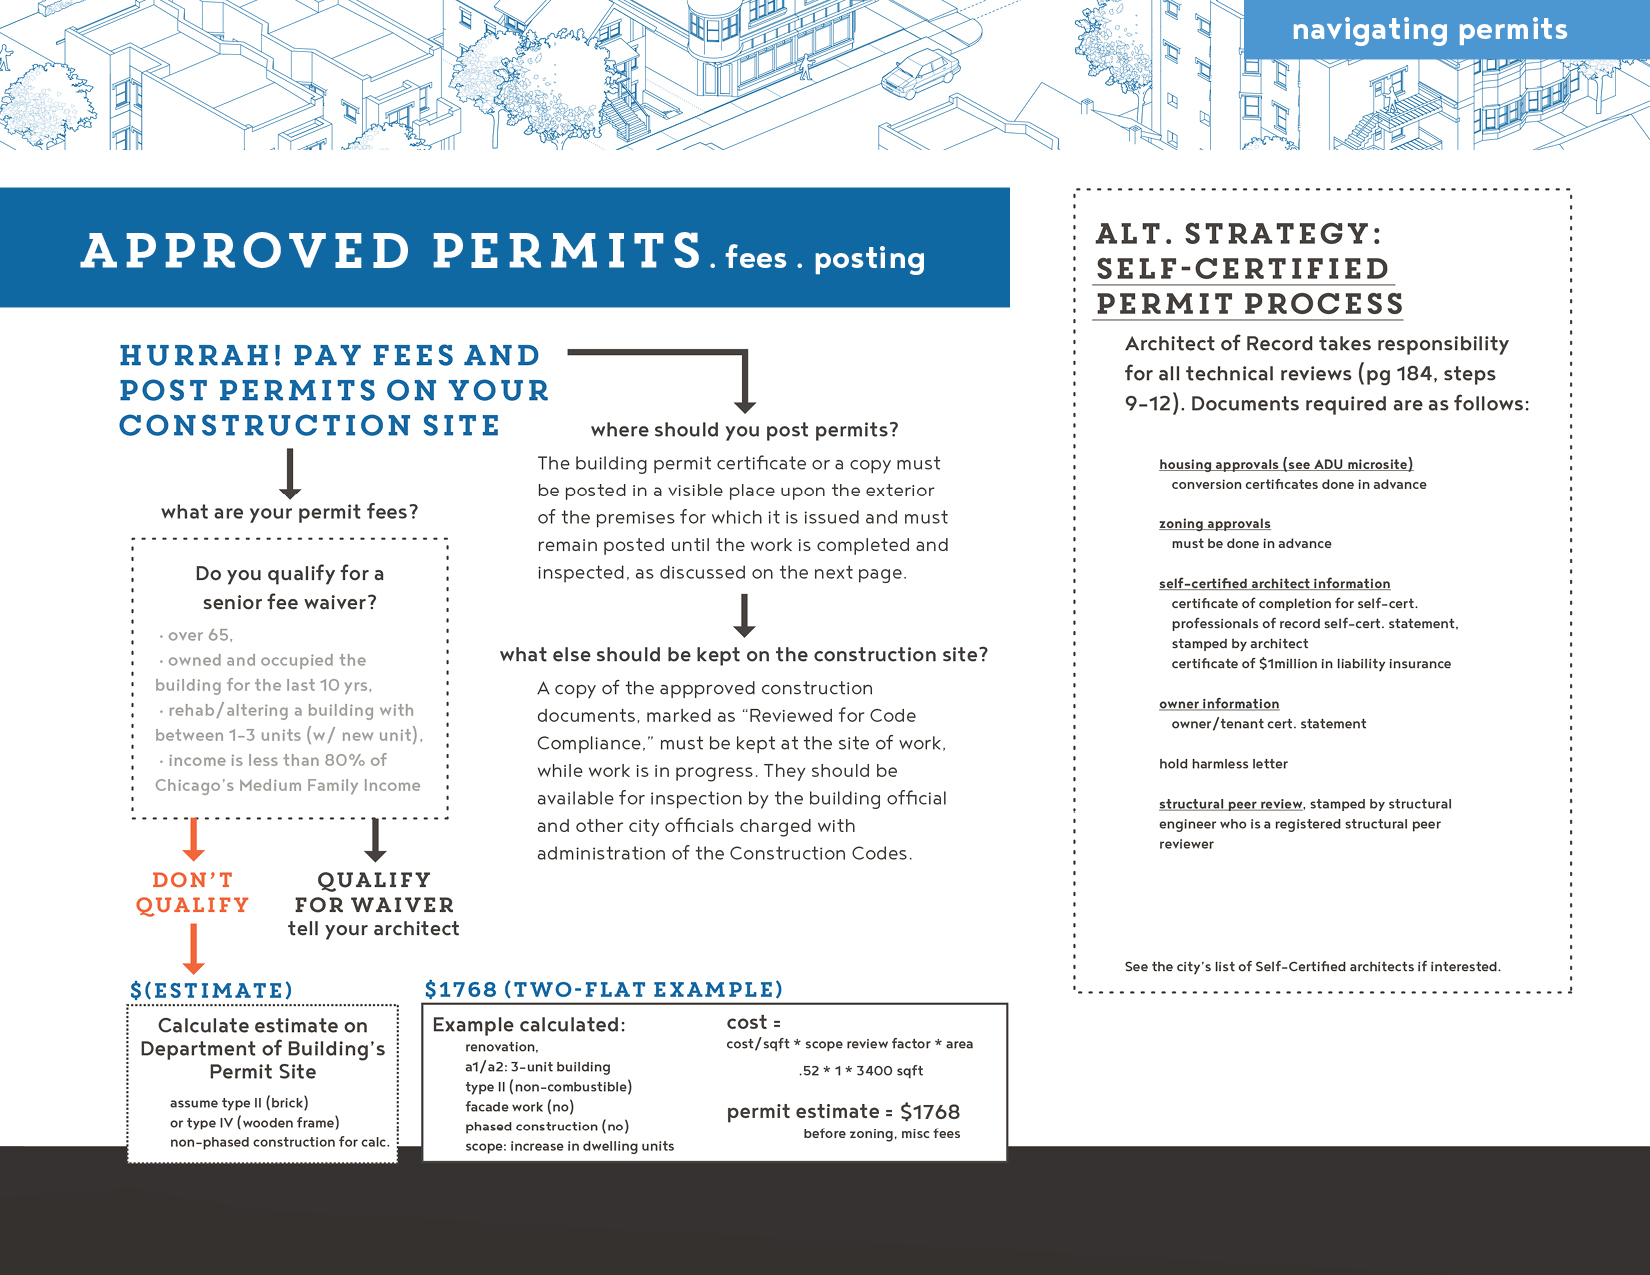
Once the construction permits have been approved by the Department of Buildings, you will need to pay the outstanding balance on your permit fees, so your architect can:
- download the official, permitted plans - to be held on-site for inspections and
- collect the official permits, which you must post in a highly visible area on your worksite.
Permit fees are assessed by the city, based on a general equation incorporating building type, scale of construction to be done, and total area of your building, as elaborated in the bottom, Two-Flat example.
To have your permit fees waived, you must:
- be a senior
- fixed income of < 80% of Chicago’s Median Family Income (see ‘Building Equity,’ MFI amounts).
- have been an owner and occupant of your building for a decade or more
- have fewer than four units, inclusive of the proposed basement unit.
If you qualify for a senior waiver, make sure to remind your AOR at the beginning of the E-Plan submission process, to avoid unnecessary deposit and prorated fees during the review process.
If you do not qualify for the senior waiver, you can estimate your likely permit fees by using the Fee Calculator at the Department of Buildings website. To calibrate the estimate to your building, you should input your construction type as:
- Type-II (non-flammable/protected) for solid brick walls and insulated floors or
- Type IV (flammable) for lightweight wooden frame construction and use your total building square-footage (with renovation) for the area multiplier.
This calculation provides a rough estimate, as the Department of Buildings also charges a one-time fees for permit appeals and after-the-fact permitting of emergency repairs and construction changes.
alternate permit processes:
As noted earlier and shown at the left, based on your architect’s qualifications you can choose to follow the Self-Certified Permit process. The architect is not required to submit a full set of technical plans for review. Instead, given their assumption of liability, they are required to submit extensive documentation of their completion of the certification process, their insurance coverage, and their licensing. In terms of technical oversight, they must have a structural engineer - who is licensed for peer review - check and certify that their drawings are compliant. As the property owner, you add a certification statement that acknowledges the architect’s liability and holds the city faultless for future technical issues.
Under the Self-Certified process, the review cycle is shorter. First your architect must submit general information for a) Housing reviews, for pilot areas, and b) Zoning Approvals to the Department of Planning and Development and receive confirmation in advance of submitting the Self-Certified Application. Second, the city’s Project Manager does a prescreening, for completeness of application and outstanding violations, skips the technical reviews, and confirms structural peer reviews before calculating fees and approving the permit.
Construction Inspections
oversight & occupancy permits
construction compliance:
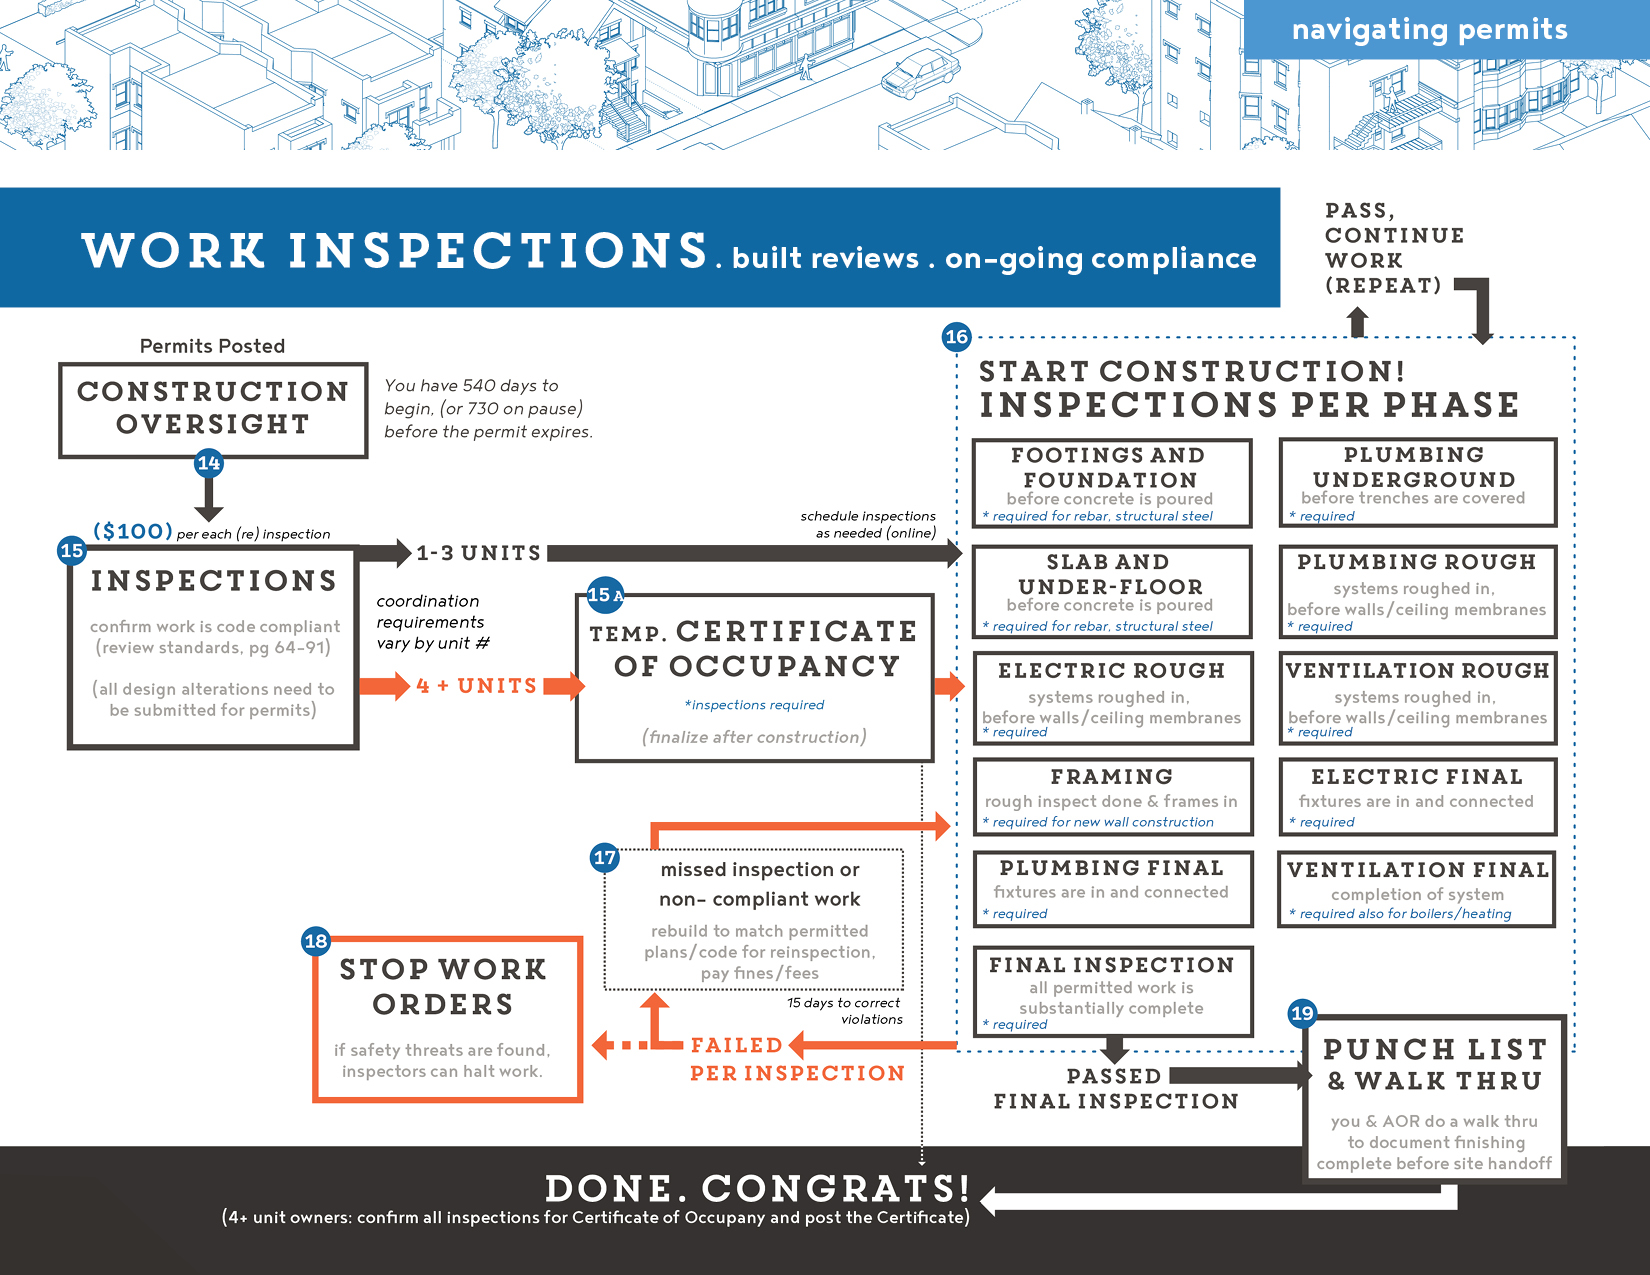
14 As noted in the Code Compliance chapter, city oversight doesn’t end once you post your permits. Throughout the construction process, building inspectors will visit your work-site to confirm that building elements and installation techniques are completed as drawn and permitted by the City.
15 If your building has three or fewer units, your architect and/or general contractor should take care of scheduling inspection appointments—by trade or issue—which can be done through the city’s on-line portal.
15a If your building has four or more units, including the basement unit, you will be required to post a certificate of occupancy (partial or temporary during construction) as well as submit to a more formal list of construction and annual safety inspections. Certificate of Occupancy forms are available from the city and dictate the full list of inspections required (will vary by building). For each construction inspection, your architect or general contractor must be present, as well as involved tradespersons, with the permitted copies of the project plans. Your work crew must provide safe access to all elements designated for inspection.
inspection process:
16 The building inspections required during a construction project are to be completed sequentially and timed to allow inspectors to see work in progress. (14A-5-502.3, 2.5,2.6,2.8) For instance, the underground plumbing inspections should occur once trenches have been dug, drainage and pipes have been placed, but before any backfill soils cover the system. Think of each inspection like an x-ray, meant to expose the interior building system to scrutiny before they’re covered in concrete, plaster, and concealing paint. Certain types of inspection - foundation and slabs - have specific timing. For these, inspectors need to review the materials within or beneath concrete (rebar or sewer lines and interior tile drains) prior to pouring and confirm that the concrete mix on-site meets the standards from the permitted documents.
Generally, most building systems will require a rough inspection - such as when basic wiring is in place and visible prior to wall completion - and a final inspection - when all fixtures are in place and the entire system should function as intended post-construction. Your architect and/or general contractor should keep you apprised of the construction and inspection schedule, so you can check on continuing process and because you as the building owner (in tandem with your agent, ie. contractor) can receive building violations and fines for an unsafe job-site and inadequate work (14A-3-301.12).
replace & re-inspect cycle:
Ideally, you’ve hired a conscientious contractor and reliable trades-people. A good architect, contracted for construction administration, will also hold construction teams to a high standard, as they’re invested in seeing their designs executed well and avoiding future liability for faulty or unsafe work. Even in the best scenarios, the construction process often unearths conditions that cause delays and overruns.
17 All of those contingencies aside, you should be concerned if your contractor either fails to schedule inspections or is repeatedly told by building inspectors to repair and replace elements. Repeating inspections costs time, materials, and labor. But this also indicates internal communication issues - between your architect and contractor - as well as cut-corners and incompetent work. 18 While it’s not too hard to repair some violations within the 15 day re-inspection window, repeat violations and fines can lead to the city closing your construction site with a ‘stop-work’ order. Under such an order, you and your architect would need to meet with the Department of Buildings and figure out how work can be safely completed. See the ‘Introduction’ section on legal recourse when dealing with poor contractors.
19 Once your building passes all inspections and the work is complete, you and your architect should do a walk through, with a ‘punch list,’ to inspect the project and highlight outstanding details to finish before.... drumroll....you get the keys to your brand new basement unit. If a four or more unit building, you should confirm that you’ve completed all inspections for the Certificate of Occupancy and order a copy to post.