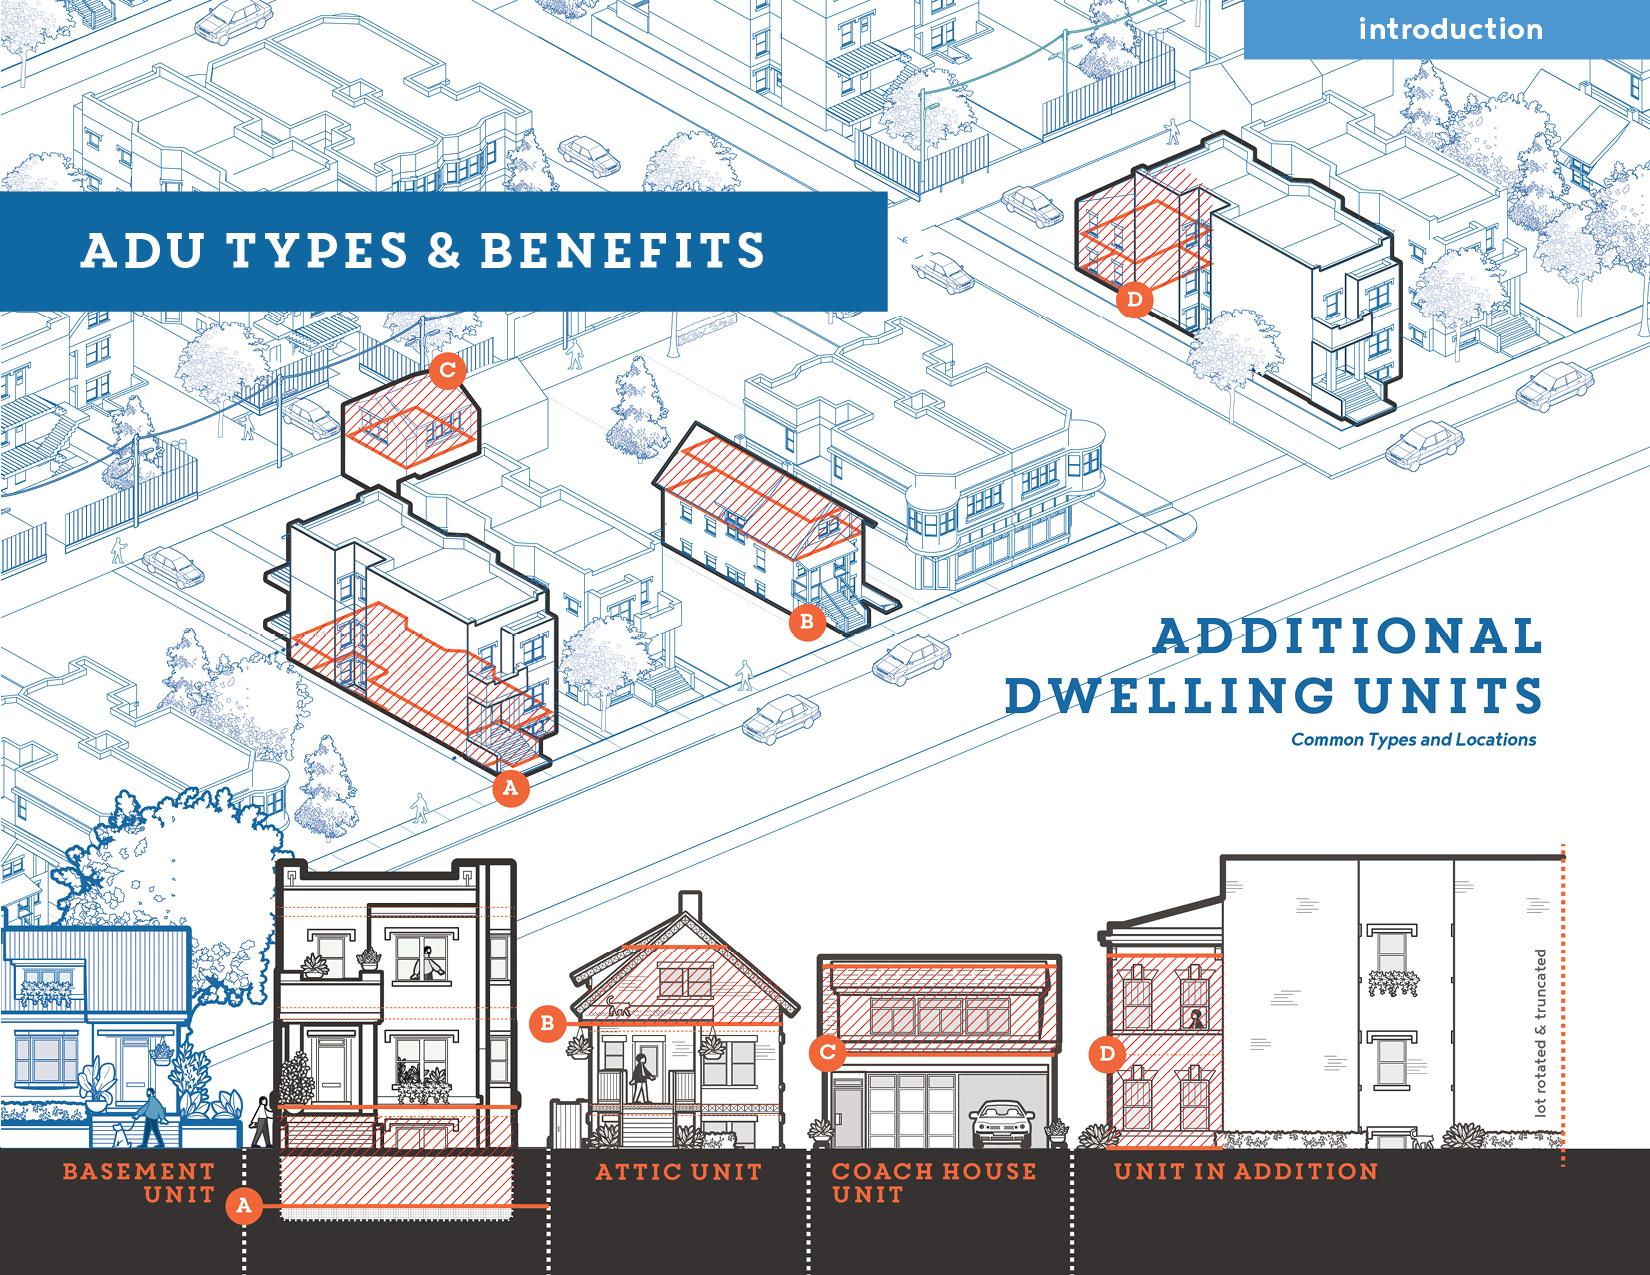
what are additional dwelling units (ADU’s)?
Basement rental units are one of many different types of ‘Additional Dwelling Units’ (ADUs). In housing policy, this acronym identifies granny or in-law flats, coach houses, and casitas. An ADU is any small unit —with its own bathroom and kitchen— that is built upon the same site as a primary residential building. This includes units in attics, rear additions, and backyard buildings. Other cities often use the term ‘Accessory’ for these small, supplemental apartments, in attached or detached positions. (See diagram right.)
why would you create an additional basement unit?
Homeowner Benefits:
As a homeowner, there are financial reasons to consider converting a basement unit:
Adding Rental Income:
The rent from an additional unit can help defray maintenance, tax, and home ownership costs. By creating an affordable unit, you widen the array of potential tenants and lower the likelihood of extended vacancies. Adding Overall Value & Equity to Your Home:
For those not on fixed incomes but seeking additional equity, basement improvements offer a form of property investment and improvement that does not require purchasing land (typically the largest cost for new development).Avoiding Fines / Costs of Non-Compliance:
It makes financial sense to bring your existing basement unit up to code to avoid Department of Building violations and fines, rightful lease terminations, and addition to the city’s ‘Problem Landlords’ or ‘Problem Building Owners’ lists, which can trigger extended vacancies.
Social Benefits:
In addition, there are a number of social benefits to creating smaller, basement units that pay collective dividends, to owners and tenants:
In-Laws, Granny, and Nanny Flats:
For those with adult children, special needs, or extensive visitors, an accessory unit can be a perfect way to tap into the social benefits of extended family and friend networks. Empty-Nest Options:
Once children leave the nest, you can swap units, downsize, and age in place, using rent from the main house to offset tax increases and area appreciation.Sustainable Housing:
Conversions create one form of sustainable housing because they tap into existing materials, under-utilized spaces, and build upon the infrastructural efficiencies of a single building. If you are looking at other renovations, you might consider the potential of doing site-wide updates combined with a basement conversion.Affordable, Transit-Oriented Development:
Tenants tap into existing transit, parks, and amenities without the economic and environmental burdens of car ownership.Community Density, Diversity, and Vibrancy:
Basement units provide additional population density and invite a diversity of tenants—by age, class, and race—in areas facing graying property ownership. New tenants provide purchasing power and inject money into local economies. Further, a diverse population can create new civic demands for schools and libraries, and provide institutional continuity as the next generation of community participants and stewards.
For all the benefits noted above, basement unit conversions require diligent construction given Chicago’s low elevation and the challenges of working with existing structures.
Creating Additional Basement Units in Chicago:
On December 16, 2020, the ‘Additional Dwelling Unit Ordinance’ was passed by city council; with pilot areas going to effect May 1, 2021. The pilot areas allow for greater density per lot with the construction of one or more additional rental units in Two-Flat and Multi-Unit residential zones (RS-2 +). Within the official language of Chicago’s ordinance, additional units are discussed as either ‘carriage houses’ (separate rear units) or ‘conversion units’ (in basement or attics). For the purposes of this manual ‘additional,’ or ‘conversion’ unit all designate a new rental unit built within your existing basement.
This manual specifically addresses basements because several Chicago residential types —Two-Flat, Cottages, even Bungalows— commonly have full height basements for conversion. In addition, illegal basement units serve some of the city’s most vulnerable populations (with rent well below market rates); this guide should assist in bring such units up to code, for the health and safety of tenants, while preserving access and affordability.
This manual helps you, a potential ADU creator, capitalize on the benefits of a basement unit and realistically address construction challenges. It walks through the core requirements for a legal basement unit and lays out the key building systems necessary for safe inhabitation. It provides the tools to weigh the social, economic, and personal value of an additional basement unit with the costs, construction, and liability required. The goal is to help you assess the viability of a basement unit and understand the building systems involved, so that you can engage with financing, design, and trade professionals in pursuing a project.
Chicago's Housing Needs
the need for affordable, additional units
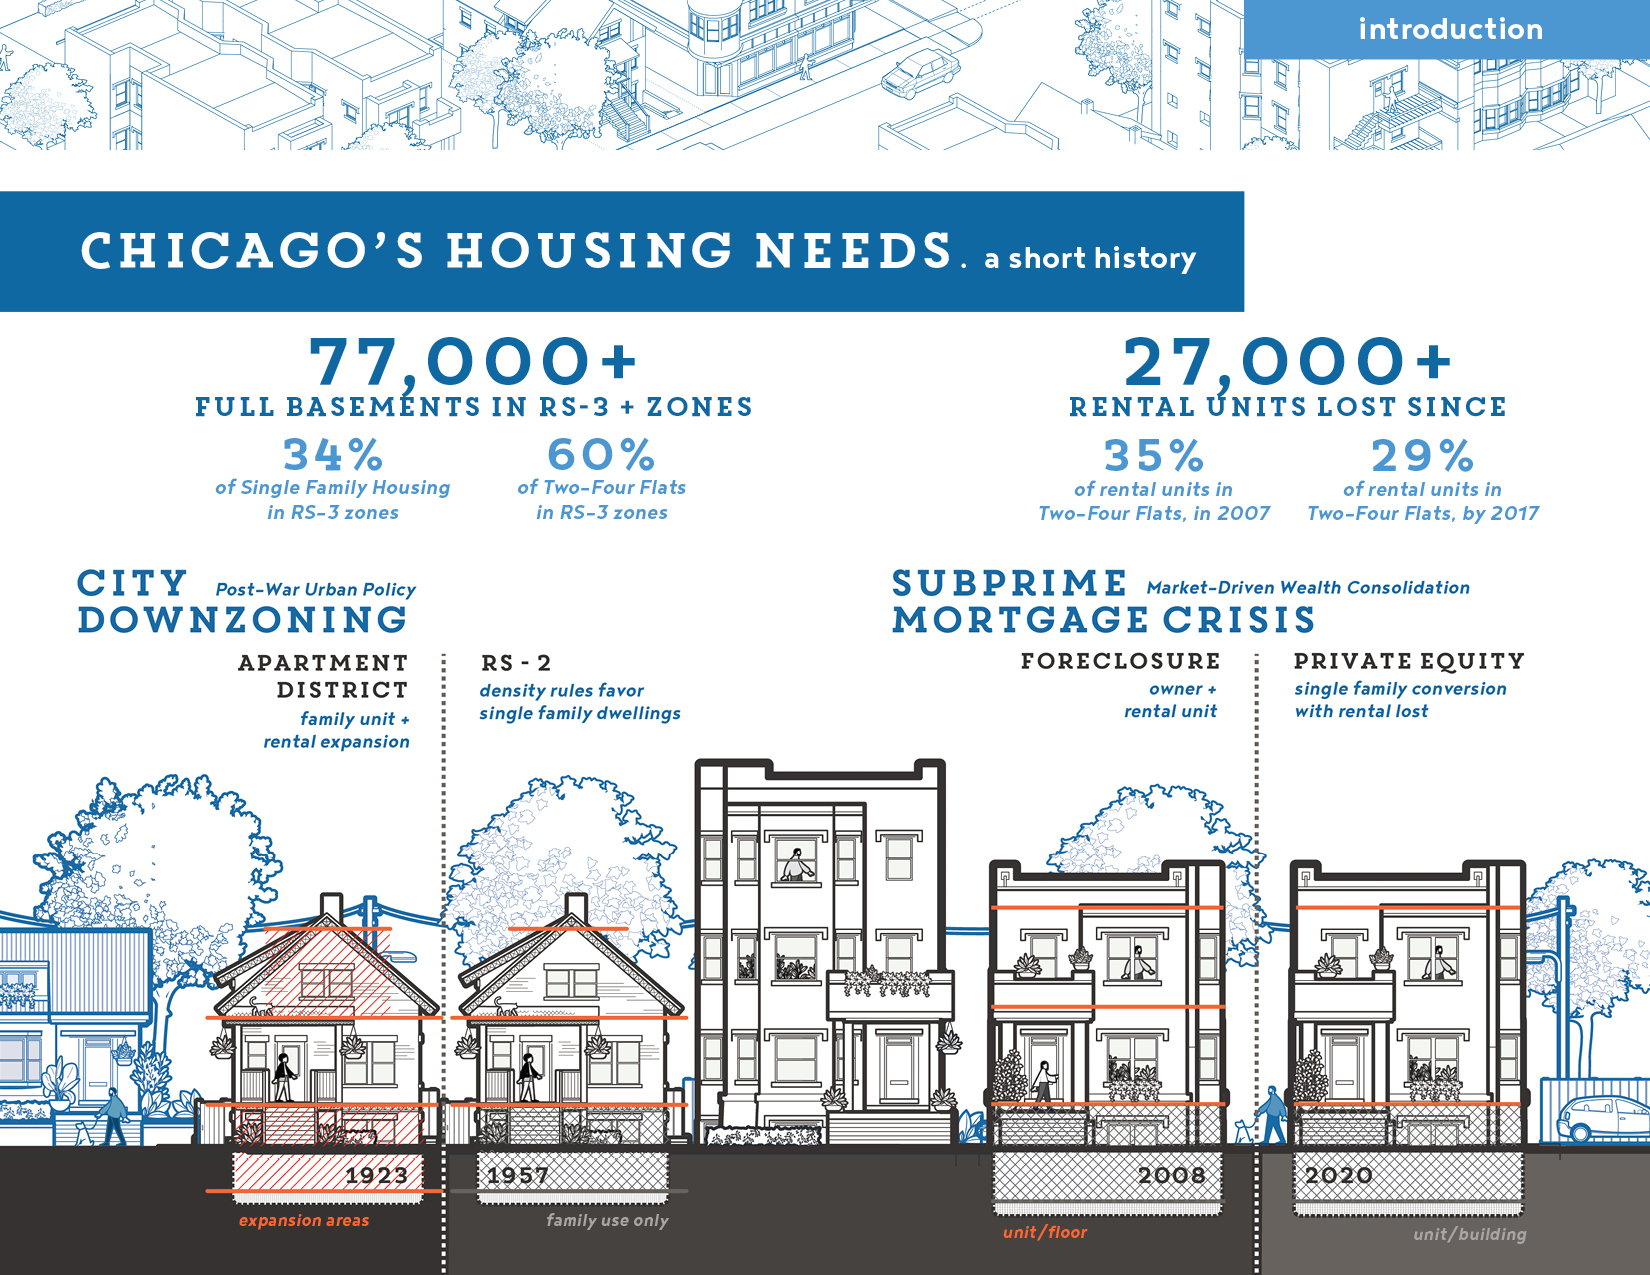
Your decision —to convert a basement unit— should be made based on your circumstances and a desire to create housing. At the moment, Chicago lacks at least 120,000 affordable rental units, with a sizable need for accessible housing for aging and differently-abled tenants. DePaul’s Housing Institute estimates that Chicago’s existing housing stock could easily add 175,000 affordable basement units. Just in Two to Four-Flats, DePaul estimates over 77,000 basements could be converted, distributing more affordable housing and increased density throughout the city.
How did we get here?
Mid-Century Downzoning
After facing housing shortages during World War I, Chicago saw a housing boom during the 1920s. In 1923, the city implemented zoning, largely regulating building shapes to guarantee air and light access. Most residential areas in Chicago were designated ‘apartment districts,’ which permitted the development of Chicago’s characteristic courtyard buildings and Two-Flats. Beyond the Loop, Old Town, and Near South Side, the majority of Chicago’s current housing was developed in the interwar era.
Near the peak of urban in-migration in 1957, Chicago revised its approach to zoning. It supplemented the 1923 ordinance with an emphasis on exclusionary uses (i.e. no commercial storefronts in residential zones), density ratios (allowable units/lot area), and changed most ‘apartment districts’ to be single family zones, designed to limit over-crowding. This shift suppressed the creation of smaller apartments and extended family flats. Following these rules, developers focused on making stand-alone bungalows or, for commerical investors, lakefront towers and up-scale apartments. Combined with racial covenants, redlining, and ‘blockbusting’ speculation, the municipal support of single family development reinforced segregation and fostered white flight, a declining city tax-base, and urban disinvestment.
subprime mortgage crisis
In addition to zoning, the current housing shortage also has its roots in the recent, subprime mortgage crisis. Succinctly, subprime lending before 2008 focused on areas that saw minimal mid-century investment due to redlines and older multi-family housing. With a higher percentage of predatory loans, these neighborhoods were hit hardest by foreclosures after 2008. They experienced increased instability for renters and a greater number of distressed properties sold to private equity and remote investors. Nearly 27,000 rental units have disappeared from two to four-flats, due to decay, demolition, and conversion into single family homes (in gentrifying neighborhoods).
The zoning reforms of the ‘Additional Dwelling Unit Ordinance’ present the opportunity to increase rental housing stock with additional units and support local, owner-occupied investment in Chicago’s neighborhoods. As will be discussed in ‘Code Compliant Units,’ the pilot areas are designed to test different regulations aimed at limiting gentrification and fostering afforable rents. (See the City's ADU microsite for more details.)
Doing Basement Conversions Right
creating safe, sound, and legal basement units
Census research from Enterprise Community Partners and the DePaul Housing Institute for Housing Studies has found that a large portion of Chicago’s lower-income renters live in basement units. These units are more affordable, but often noncompliant with City codes, posing serious health and safety hazards for tenants. Saying that a unit is ‘illegal’ under zoning regulations does not automatically make it unsafe, but trying to keep the unit ‘hidden’ from the City’s building inspectors and tax assessors can lead to a number unintended, but consequential risks.
The tenant-owner relationships is based upon mutual extortion, making it an unstable living situation and risky source of rental income:
- tenants of illegal units, facing subpar facilities, don’t have many legal recourses, but they can report the owner to Department of Buildings, risking housing loss
- this bind allows owners to forego upkeep. But, if they take tenants to eviction court, the tenant can claim the unit is illegal and initiate the reporting above,
Keeping a unit ‘off the books’ can thus expose it to more serious regulatory scrutiny and financial penalties, making it a very risky investment strategy: illegal units are more likely to be reported for building code violations and receive visits from building inspectors, casting scrutiny on the entire structure. In turn, this deferred scrutiny increases the likelihood of:
- immediate building violation fines, with the attendant costs of deconversion and rebuilding costs. Old violations will also effectively halt your ability to pull permits for other repair work.
- city liens, for violations or back taxes, due to inaccurate assessments and under-calculated property taxes, and, given liens,
- legal actions (being sued) by mortgage lenders, for the violation of mortgage clauses, by which the owner commits to the lender to maintain the property title lien free.
In addition, if the owner is ‘hiding’ the unit, they may only have single family, not landlord, insurance and will be exposed to full liability and medical expenses for property accidents. Likewise, owners often fail to report illegal units’ rental income for taxes and thus owe back-taxes and fines to state and federal authorities
While you might shrug off these investment risks and the correction costs, it’s important to consider two things:
- Losing an affordable unit, due to lackluster maintenance or even minor fines, can be devastating. Eviction, the trauma of moving, and the loss of a stable address can interfere with processing paychecks, accessing education, and maintaining community ties.
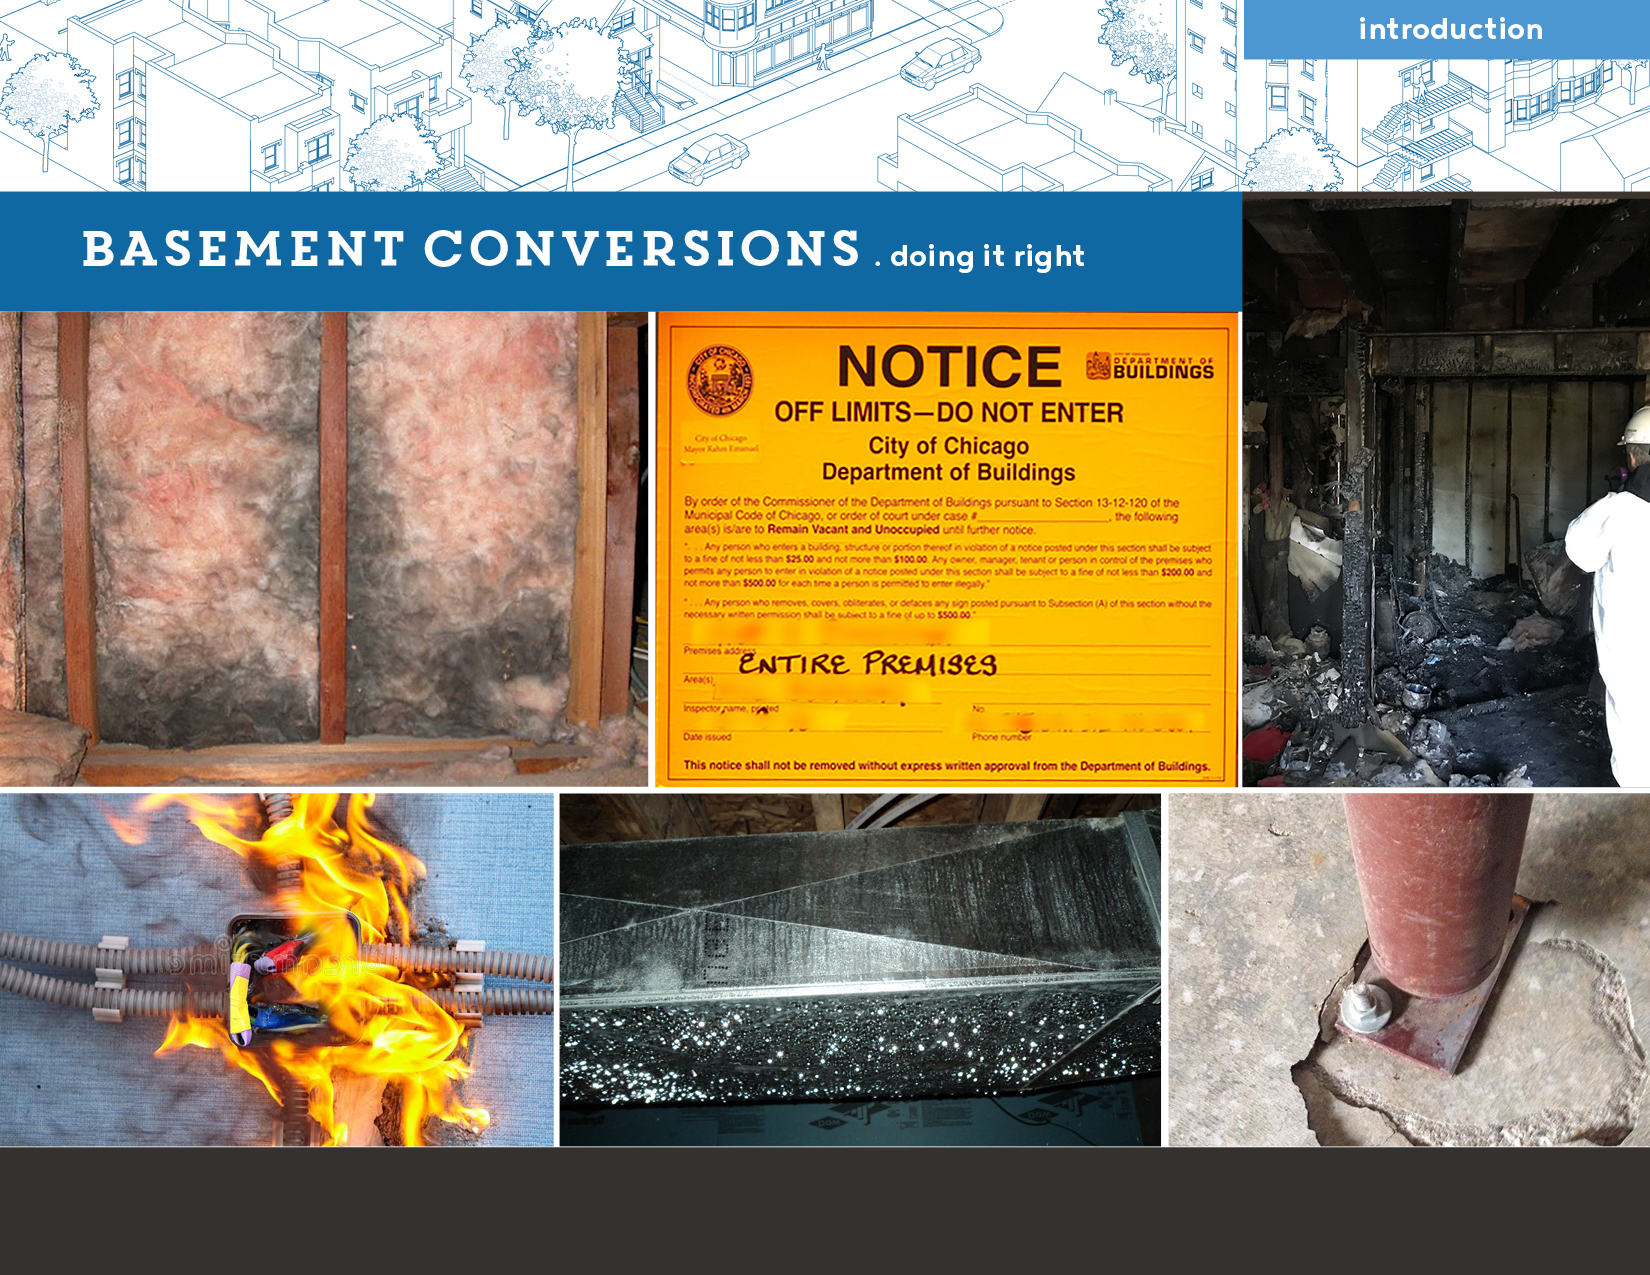
- Your personal liability with an illegal unit could also be devastating. You can be held fiscally (and criminally) responsible for accidents on the property, poor maintenance, or building failures and fostering legitimately dangerous conditions. Basement units can host a number of hazards—moisture, mold, and radon—which accelerate structural decay and exacerbate chronic health problems. An untended, illegal basement unit can be a dangerous thing, physically, financially, and legally.
If you can cover the costs of a major civil lawsuit or extensive insurance, you have the means to finance code-compliant renovations and make your basement unit safe. If not, you should explore the home improvement loans from Neighborhood Housing Services.
For those resistant to paying for code-worthy work, the following pages examine the costs of non-compliance. While these scenarios emphasize material and safety hazards, the human costs should not be underestimated.
Hazards Scenarios I
structure: damage due to altered support systems
For all of the following scenarios, the assumption is that a basement has been occupied, but without renovation and adaptive updates. Keep in mind that any hazard you neglect in the basement will eventually affect the building as a whole; bad basement decisions trickle upward. Any time you bring a system up to code, you’re not just protecting your tenants—you’re protecting your home and any equity held within your property.
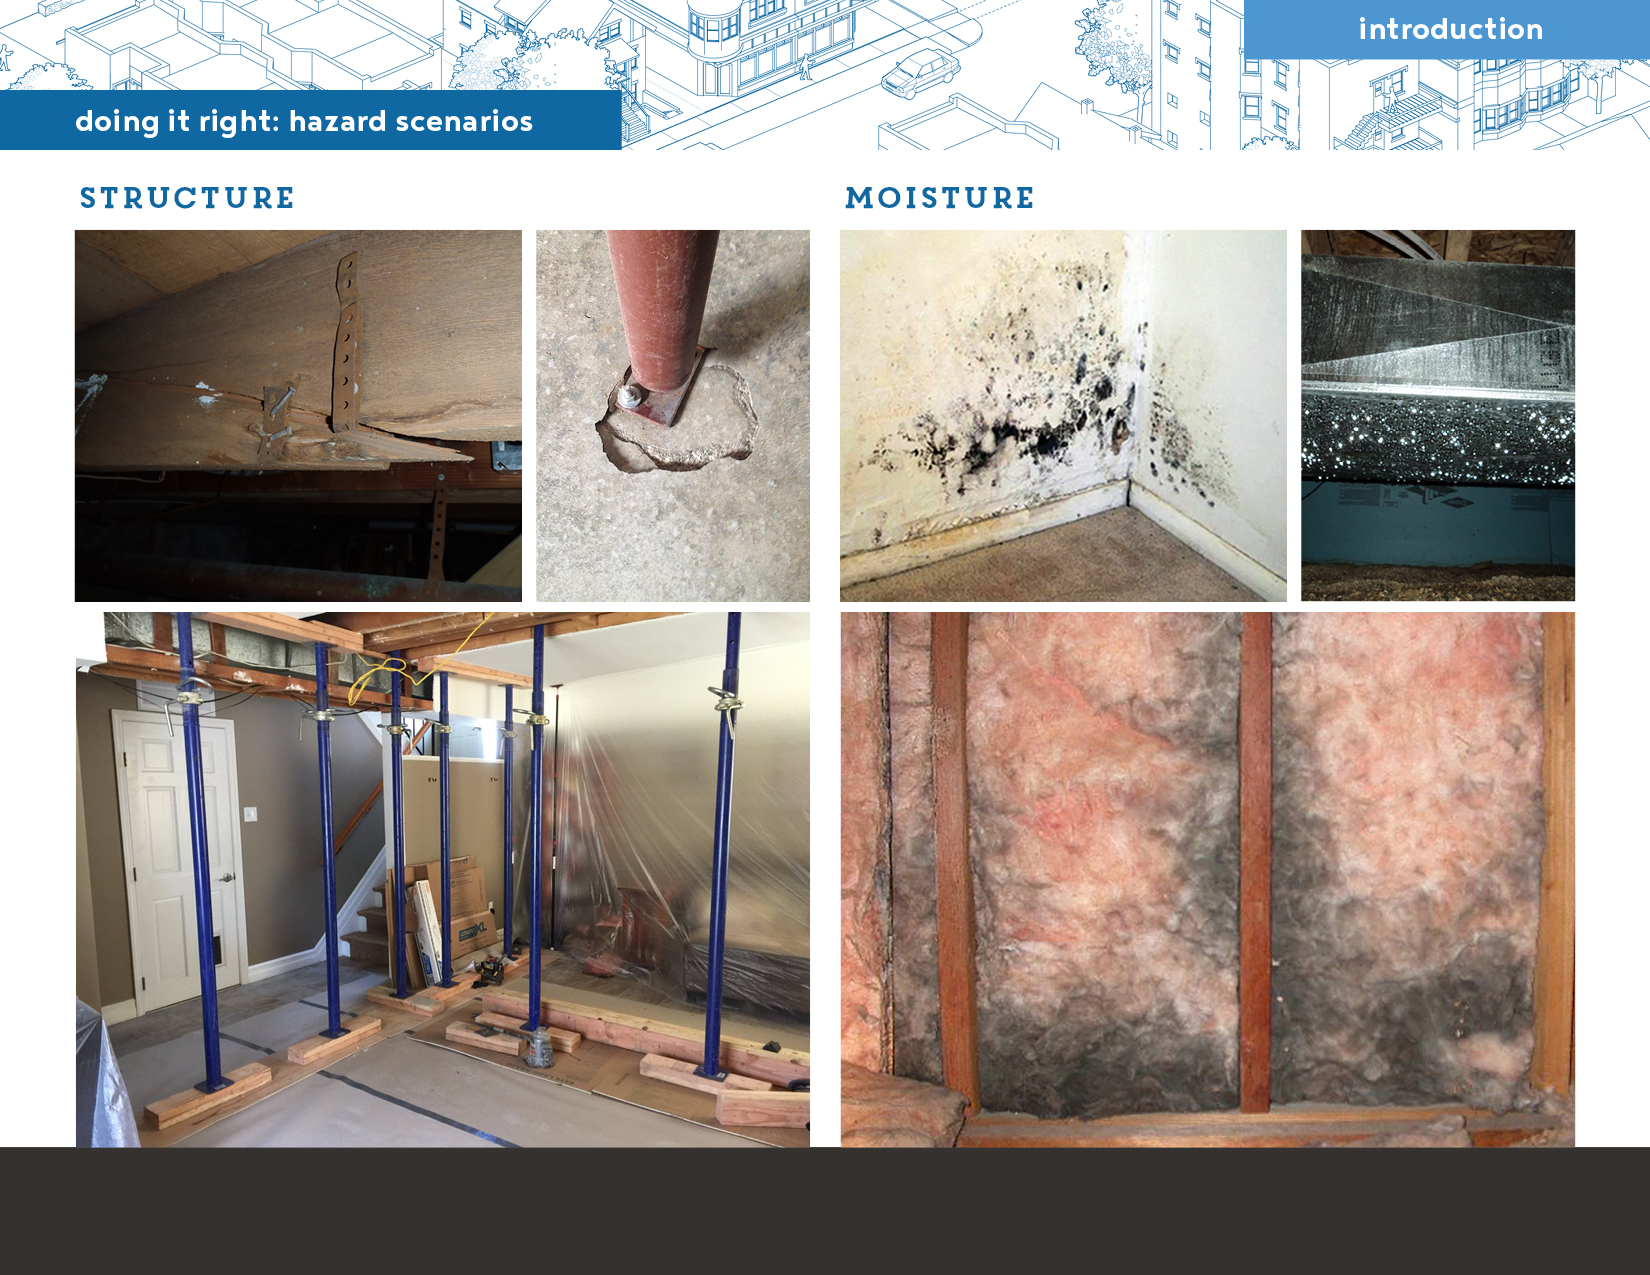
Consider this structural hazards scenario: Instead of replacing a bowing beam, you decide to add a number of walls to redistribute the weight from upper floors across your existing slab.
initial benefits:
- less expensive (frame walls are cheap)
- efficient (you need unit walls anyway, right?)
- intuitive, as temporary frames are used to stabilize structures during construction.
however, this will lead to linked structural problems:
- extra pressure from those walls will likely crack your slab, enabling water and radon seepage, damp rot and health issues
- moving support locations introduces new tension and compression forces in the main level’s floor and the walls above. This is likely to appear in sloping floors, plaster and floorboard buckling—i.e. signs of accelerated structural failure.
Properly replacing a beam and adding columns only costs between $4,000-$7,000. But a ‘cheap’, quick fix multiplies your problems: slab patches ($2,000-$3,000), air sealing ($3,000-$7,000), localized wall/ceilings repairs ($2,000-$4,000), an engineering assessment of the structure ($300-$700) and your home insurance can cancel your policy for non-permitted work. The ‘cheap’ route cost between $7,300-$14,700, in advance of further structural repairs. It’s dangerous and doubles your bill. And this is the best-case ‘bad’ scenario; a floor collapse would compound your liabilities.
moisture: mold & rot in non-waterproofed areas
Consider this moisture-based hazards scenario: Instead of adding foundation drains and sealing your walls, which are mostly dry, you decide to simply finish the interior, with a mix of drywall and exposed brick. Let’s assume, if you didn’t seal the foundation walls, you probably didn’t check for foam ‘isolating’ gaskets beneath your basement and upper, wooden building structure.
initial benefits:
- aesthetically pleasing (brick walls are ‘trendy’)
- cost efficient (basic labor needed for standard residential wood, fiberglass, and drywall)
however, this can lead to mold and moisture in several places:
- without moisture barriers and drains, loose insulation will act like a sponge: exterior groundwater will seep into the walls and, during the summer, will condense on the inside surface of your foundation. With additional moisture from downspouts, plumbing or steam-heating leaks, it is easy to create a massive (black) mold problem. The air quality, allergy, and health impacts will likely make the unit unrentable.
- the moisture in your foundation walls and surrounding ground can also migrate upward one to two feet (max), which, in a very low basement, can impact sills and basement ceiling joists. This ‘rising damp’ will appear in basement walls and corners, accelerating structural decay and rot.
Properly adding foundation drains and sealing walls is not inexpensive ($6,000-$13,000) with limited slab work. But a ‘cheap’ fix creates additional problems, concentrating moisture inside your structure: to resolve this you’ll need to demo interior walls ($3,000-$4,000), reassess structural rot ($300-$700), and add the required drainage before then replacing, conservatively, half of your basement walls ($15,000-$30,000). Even without rewiring, correcting mold, or getting repair permits, the ‘cheap’ route doubles or triples your costs. And you’re facing serious health and structural issues.
Hazards Scenarios II
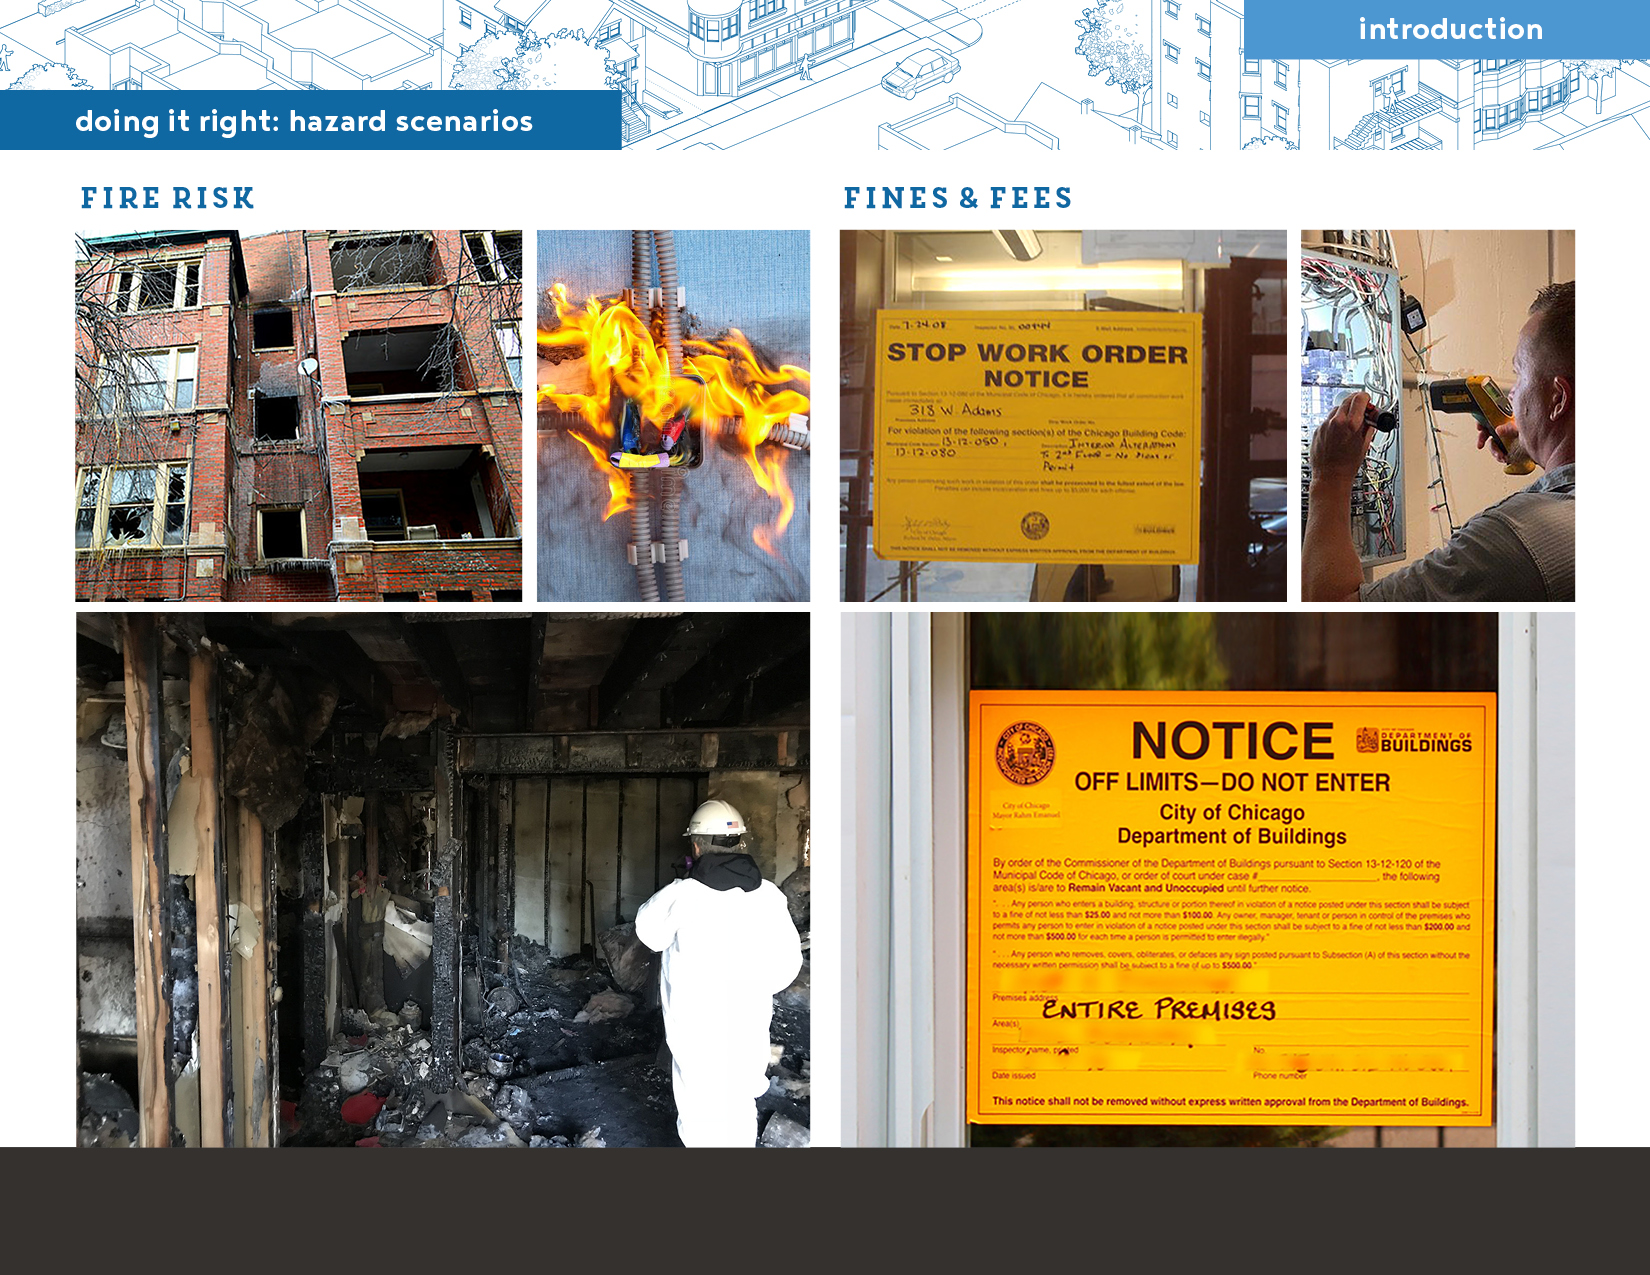
fire risk: using old finishes & existing electric systems
Consider this fire-based hazards scenario: Your basement is already wired, with fixtures from the 1970s. You pick smaller appliances and instruct tenants to use power strips. By leaving circuits as-is, you keep the current plaster ceiling intact.
initial benefits:
- inexpensive (no rewiring costs, no refinishing costs)
- limited visible impact (can’t worry about what you can’t see)
however, these short cuts could create serious fire hazards:
- your electric wiring has old, rotten insulation. Within those conduits are potentially exposed wires, so adding new fixtures can overload the system. Internal sparks or short circuits are enough to start a nasty electrical fire.
- your midcentury ceiling is probably fire-resistant for around 15-20 minutes. When heated, the old plaster shrinks, falling off of the lathe and exposing the wood structure to the fire much faster than new, fire resistant drywall would. This allows the fire to climb to the upper stories very quickly.
- if you’ve ignored the hazards above, your house likely lacks working smoke detectors. In a best-case fire scenario, everyone is awake and exits the premise, with the shirts on their backs. Worst case, everyone is asleep; there are no survivors.
Properly adding ceiling fire partitions and separate electrical for a unit is pretty inexpensive ($7,000-$12,000) considering the risk. But alas, the ‘cheap’ route amplifies risk to your tenants, your structure, and your life. Leaving aside civil and criminal negligence, the costs incurred for ignoring fire code could amount to all the equity in your home or your life.
violations: fines & fees
In any of these scenarios, it’s assumed that you end up dealing with the material consequence of poor construction or maintenance decisions; the cost of short-cuts is equivalent to the cost of replacement or lost property and lives. In reality, you’ll also need to apply for permits for repairs and, if you are reported by a tenant, you can face a number of different fines for code violation.
Consider the mold and moisture scenario. You could be held responsible, and face any of the following violations, as well as associated fees for general violations:
- arrange for an inspection (you’re been reported, thus need to be inspected to determine other violations)
- remove work performed without a permit (the walls, finishing)
- unsafe conditions (extended structural rot, mold hazards in general)
and issue specific violations:
- stop leaking water (you need a foundation drainage system)
- repair or replace exterior walls, plaster, paint (three separate citations, any of which could apply to mold)
Each violation can run between $500-$1,000, with unpermitted work carrying subsequent fines that top out at $3,000-$5,000, and unsafe conditions violations (which trigger structural assessment) can cost between $1,000-$2,500. So you could find yourself facing around $4,000-$8,500 in violations on top of the costs of replacement materials and actually permitting new work.
When facing code violations, you may also decide not to rebuild a unit. This would limit your losses to fines, demolition costs ($3,000-$4,000), and, if the unit is legal, permits for unit deconversion.
Using This Manual
this manual helps you do conversions correctly
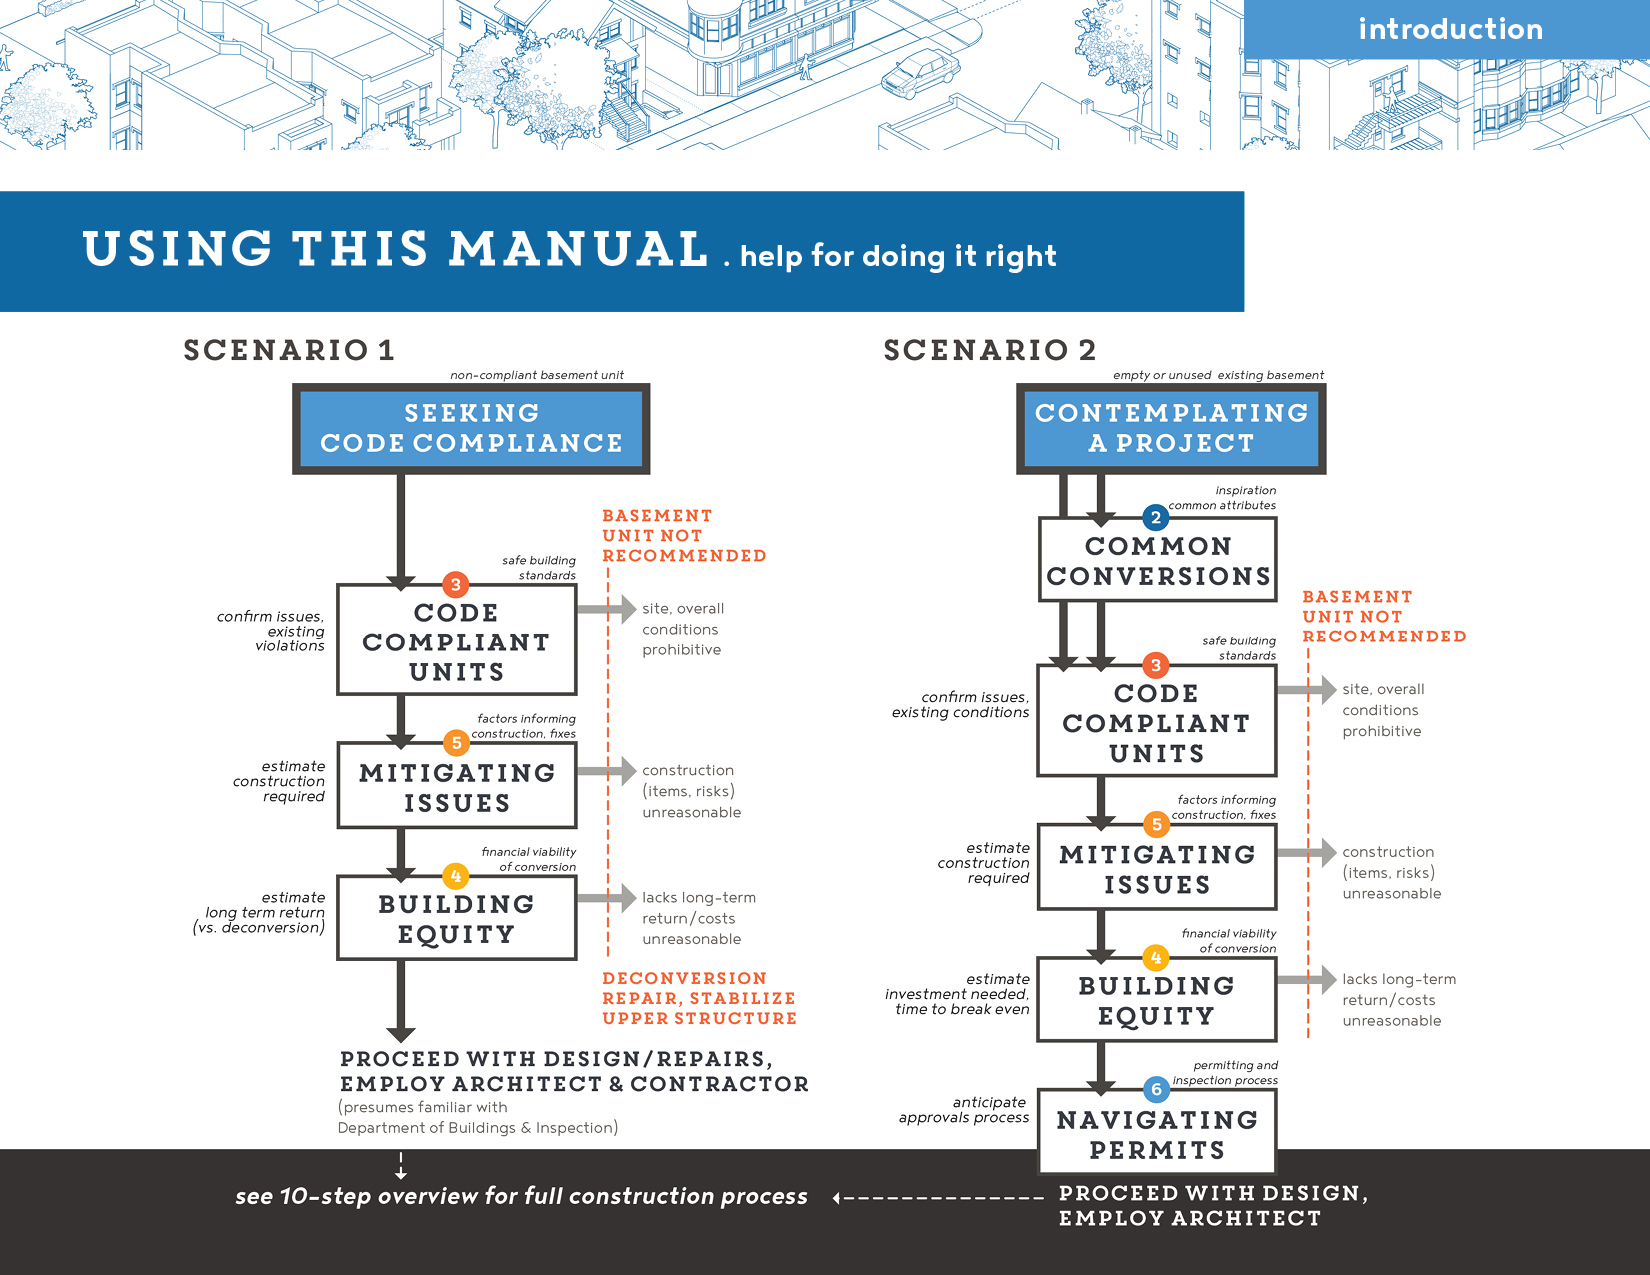
If you’re an average homeowner, the thought of converting your basement can be overwhelming; the costs and challenges feel formidable. Where do you start? As noted in the diagrams at left, if you’re reading this, you likely fit into two general categories of owner-occupants:
- scenario 1) someone who has an illegal basement unit that they wish to bring into compliance (or deconvert) and has experience with the Department of Buildings, or
- scenario 2) a homeowner with an existing, empty basement who is interested in ADUs, but has no particular experience with design, construction, and code compliance in Chicago.
core conversion info:
You can take a linear approach, skimming the manual, or dive directly into issues of concern. In either scenario, the core contents of the manual —chapters 3, 4, 5— walk readers through:
-
assessing an existing basement —with or without a unit- and identifying non-compliant issues and code violations
- tabulating the long-term costs and benefits including capital investment and rental income, as well as operational overhead and maintenance reserves to determine when/if a basement unit is profitable and financially feasible.
- selecting applicable approaches to ‘fix’ each code issue—based upon property/project characteristics—and tallying the likely construction and costs of a basement conversion.
Each manual chapter is broken down into ordered subsections, so you can review one code element, one financial aspect, or one construction choice at a time. Each subsection defines the topic at hand, identifies relevant technical experts for consultation, and includes illustrations to aid in visual assessment of your property and project. This approach allows you to proceed at a comfortable pace and treat each subsection as stable reference.
Each chapter also provides a mechanism to tally your observations in order to see interrelated tasks or financial implications. In ‘Code Compliant Units’, this includes assessment templates—for creating your own basement plan and notes—to aggregate your observations. In 'Mitigating Issues', decision diagrams help you trace likely construction trajectories. In 'Building Equity', linked spreadsheets calculate overall outcomes, pulling together your input with factors like area appreciation, interest, and affordable rental rates. These synthesizing tools typically rely on earlier decisions, so they work best if completed in a linear matter.
for those new to construction projects:
For those new to construction, code, and conversion units (scenario 2), two additional chapters are provided, preceding and following from core decisions:
- introduces common Chicago residential buildings and how their characteristics affect what can be done in a basement ADU. Potential basement unit plans are provided as a guide.
- outlines the process of applying for zoning/building permit applications, including time and permit fee estimates.
These chapters bookend the core decisions, providing inspiration and an overview of building regulation more generally.
The proposed plans, in Common Conversions, underpin examples in all the other chapters so it is helpful to review those, even if you are focusing on the main compliance and construction sections.
Basement Projects, step 1-5
working with architects
basement conversion: a visual guide to construction
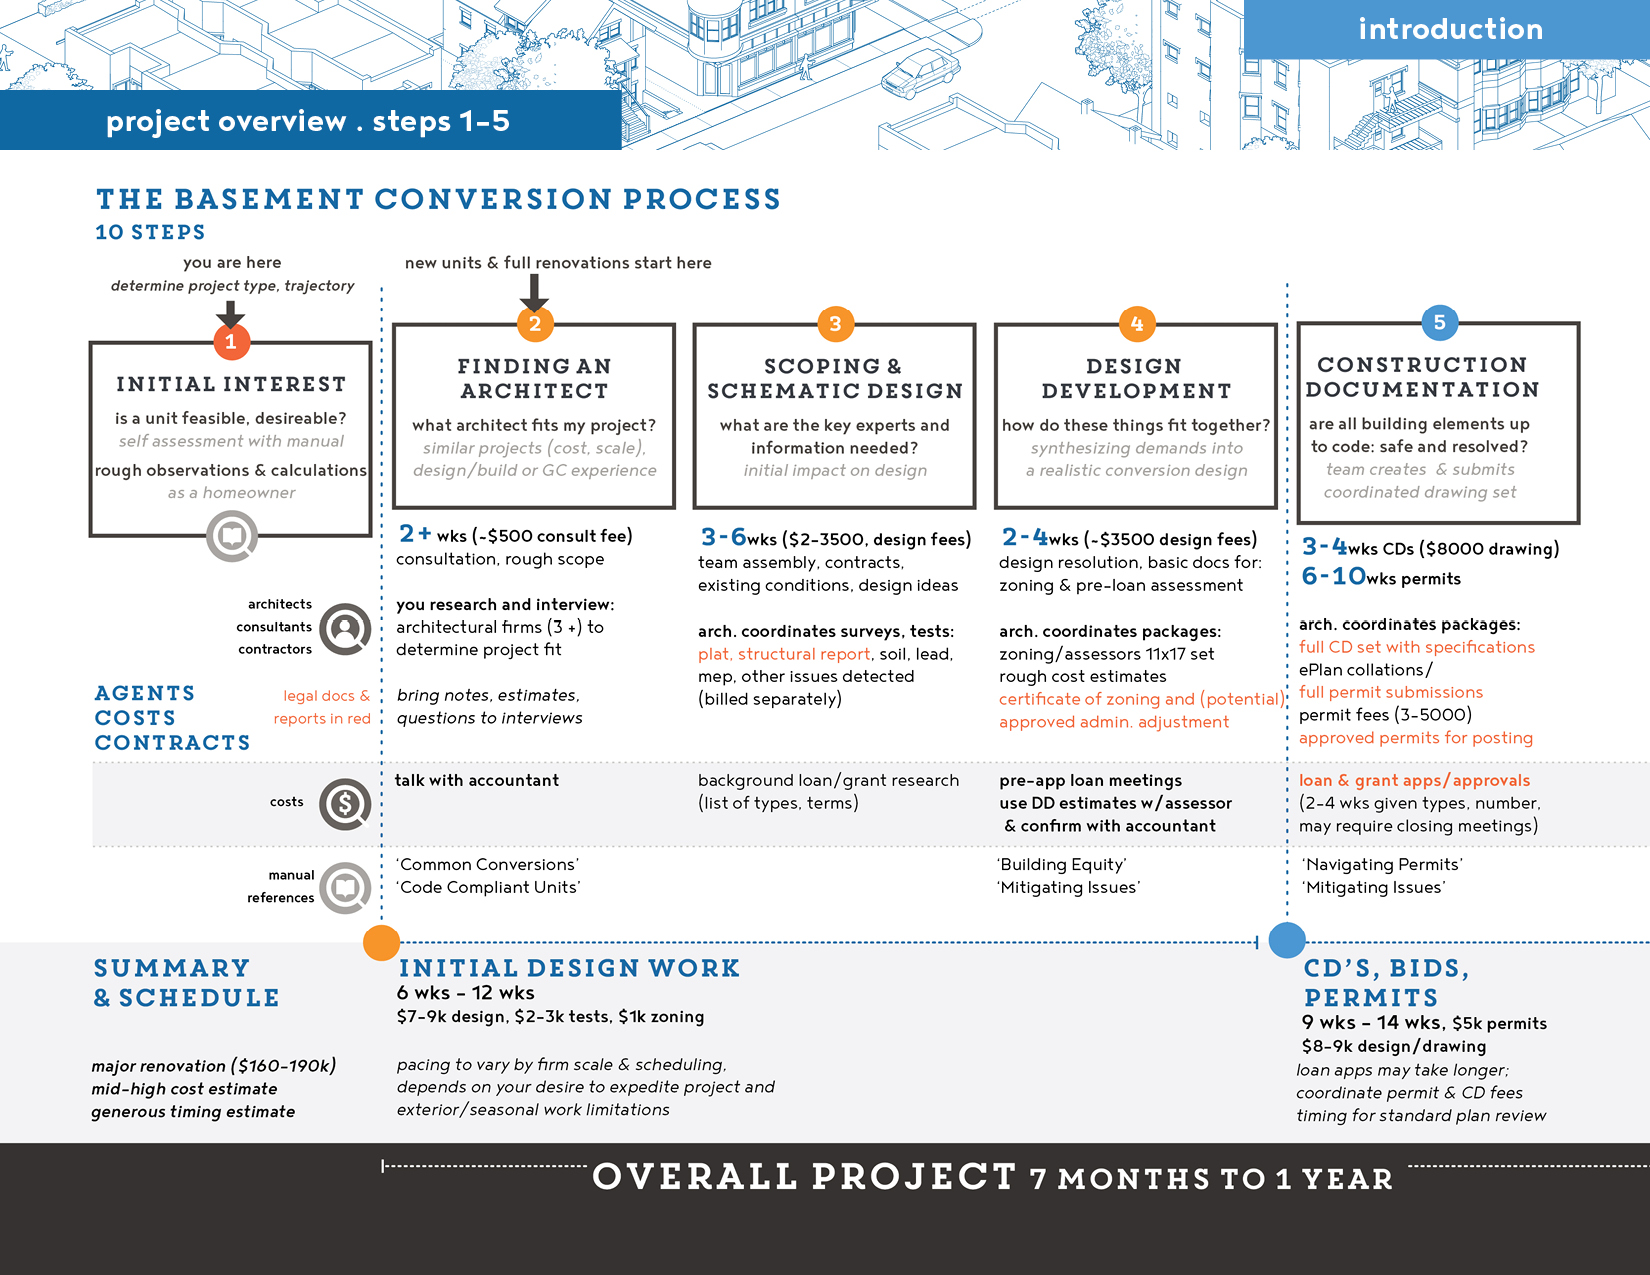
If you’ve never done a construction project—major or minor—it’s also helpful to understand the broad contours and steps required. A basement conversion is not a small undertaking; it can involve structural and slab repairs, revised utility connections, new interior partitions, and finishing. In general, renovations require higher design fees and may be just as time consuming as new construction. This is because any new element must successfully dovetail with existing structures and the constraints of working on smaller, older sites.
The following section provides a visual summary of the 10 steps (1-5, then 6-10) involved in a medium to larger project (the last two relate to ongoing management). For each step it details:
- the main design or construction tasks, including:
- avg. timeframe,
- costs for architectural drawings and meetings,
- design products or deliverables
- red highlights identify legally binding documents—drawings, permits, contracts—as coordinated by your architect, structural engineer, or general contractor
- general timing of loans and financial decisions
- manual sections that act as process reference
For aggregated steps—the initial design process, construction documents through contract bidding, and construction itself—the graphic summarizes typical duration, costs, and scheduling variations.
1 Initial interest
This manual is meant to peak your interest in a basement conversion. The ‘How to Use’ section, above, should guide you through the different chapters, to determine whether the addition of a basement unit makes sense for your building and circumstances. The manual flags expert guidance and should assist in conversations with your architect, engineer, and contractor, throughout the larger design and construction process.
If you decide to pursue a project, you should confirm financial feasibility and legal risks with a) an accountant and b) a lawyer.
- An accountant can review the estimates of ‘Building Equity’ and finesse a reasonable budget range given your fiscal resources. This ballpark number will enable your architect to realistically establish expectations and scope.
- A lawyer will be useful throughout, for contract negotiation, and distinguishing boiler-plate language from anomalous or risky fee structures.
- As a landlord, you’ll need a real estate lawyer to advise on property liabilities and navigate lease and eviction proceedings.
- Exceptional circumstances: If your property has atypical zoning issues, you may need a land-use zoning lawyer (a sub-specialty of real estate) to assist in appeals.
- Ideally, the same law professional (or a firm) practicing within real estate can guide you through contracting with architects, contractors, and permitting procedures.
If you do not have an accountant or lawyer, you should research and seek out professionals in advance of contracting an architect and beginning the design process.
2 finding an architect
If you decide to pursue a basement project, you’ll want to hire an architect to direct the design process. While it may not be necessary for deconversion or a very small renovation, hiring a licensed architect can make the conversion process run a whole lot smoother. In Chicago, you will need an architect to submit for most building permits, under standard plan review. An architect will also provide a network of expertise, including trusted consultant engineers, contractors, and trade specialist.
You should begin by making and contacting a list of relevant firms to interview. Architectural practices specialize so you’ll want to find practitioners who focus on residential renovations, within Chicago, and, ideally have worked on basement unit additions. Resources for finding firms include:
In addition to general renovation and basement experience, you might seek out firms that have experience as: a) general contractors, b) do design/build work or c) are self-certified to expedite permitting, for integrated quality control on your project. Based on your goals, focus on what you want to achieve and seek out firms with that experience.
Before the interview, collect the notes you made when reading through this manual; jot down all your requirements and highlight any basement problems. Think in terms of what’s necessary and what’s desirable in a basement unit. Don’t worry about sketched solutions or plans—that’s what the architect is for. Gather the initial budget, from the ranges presented in ‘Building Equity,’ and your realistic revisions. This will help you discuss costs upfront and avoid disappointments, when facing revisions in construction documentation or bidding.
Most architects will do an initial consultation for a small fee. You should interview a few firms (3+) to get a feel for how each pursues the design process and construction administration. Follow-up on references; if possible, speak with their sub-consultant team members and visit finished residential projects. You’ll want to feel comfortable with the design team, as they’ll be in your life (and active, in your basement) for up to a year.
Once you’ve decided, the first thing to do is tell your chosen firm and notify any others consulted. You and your architect should agree on the following before work begins:
- the project scope should include tasks and team involved. The architect should propose specific experts to address technical concerns: structural engineers, building systems experts, and others.
- cost of architectural services and billing structure, as your architect may charge a fixed fee per design stage, a dollar amount per square foot, a percentage of construction cost, or hourly fee based on assigned personal.
It’s important that this agreement is in writing and sets out the services to be provided, major deliverables and deadlines, billing structure, and outlines the obligations of each party. You have the right to negotiate the terms in the contract and ask for clarification before signing.
If possible, you should pay for early design work out of savings. At the end of Design Development, you will have solid enough designs for an appraiser’s estimate. This estimate secures financing for ongoing architectural, permitting, and construction.
3 scoping & schematic design
After finalizing the contract, the design portion of the project will start with a ‘kick-off meeting.’ There the architect will refine the project goals by asking questions, listening, and trying to understand your agenda. A good architect will develop efficient solutions and propose ways to reduce costs while coming up with a design that satisfies most, if not all, of the project goals.
The schematic design process focuses on developing general layouts for you to choose between and collecting background information. If you don’t have a recent, existing plat of your property, your architect may measure and create preliminary, ‘as-built’ plans while commissioning a survey for an updated plat. As your design team sketches rough ideas, they’ll consult with experts to document additional site and building information, like getting soil cores, surveys of utility lines, and structural assessment of existing conditions. You can think of schematic design as the initial assessments in ‘Code Compliant Units’ and rough idea generation like ‘Common Conversions’.
4 design development
After agreeing on a general layout, your architect will begin to resolve your basement design. This means your architect will show you fewer diagrams and more measured drawings, which communicate how different elements—walls, windows, doors—are placed to meet code requirements, site and building conditions, aesthetic ambitions, and more. By the end of design development, your architect should be able to prepare the 11x17 set of drawings (with existing and proposed features) required for an administrative adjustment (zoning) application. These plans should also have enough detail for an initial cost estimate.
5Construction documents (& permits, bids)
Based on survey information, consultant input, and the materials from design development, your architect will develop detailed construction documents (CDs). Typically these are done in numbered order—50%, 75%, 90% CDs—which indicate the level of resolved detail and are collated with electric, plumbing, structural, and other expert consultant drawings. The completed, stamped construction drawing set is what your architect will submit to the Department of Buildings along with their building permit application. Your architect will also develop a text document, the specifications (specs), which articulates the building products to use and how they must be installed.
Often permit/technical review and bidding (next page) happen at the same time, so your architect will coordinate drawing revisions for the city and circulate amendments to contractors, for updating their estimates. Larger projects, with more complex construction, may do bidding later in this cycle; simpler conversions can seek formal bids earlier.
In general, CD sets are far more technical than this manual’s chapters, but details from ‘Mitigating Issues’ are analogous to residential CD details. The chapter ‘Navigating Permits’ lays out the documents and process of applying for zoning and building permits, as well as meeting required construction inspections. During this process, you can anticipate at least one or two rounds of drawing revisions. Ideally the fees for this step should come out of recently secured loans and grants.
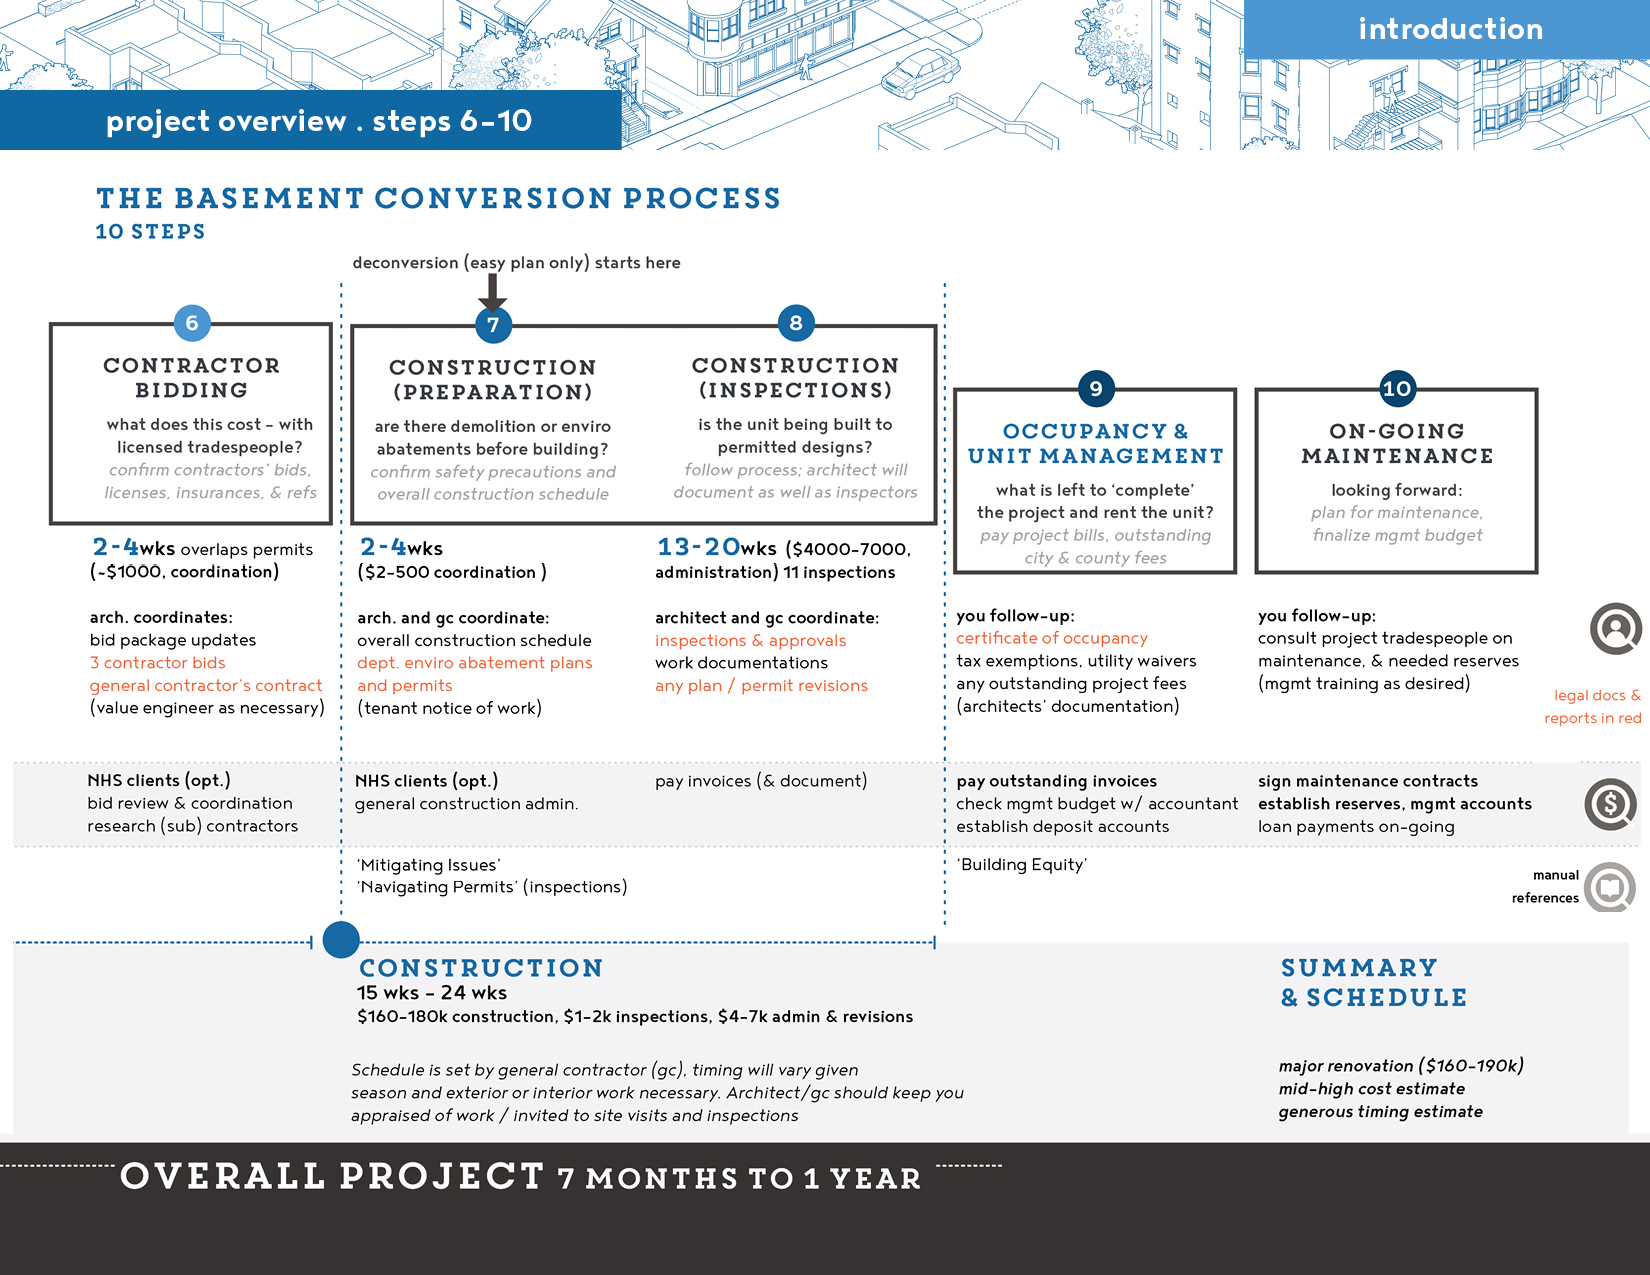
Steps 6-10
Construction, Permits, & ongoing Maintenance
6 Construction Bidding
Based on construction documents and specs, your architect will seek bids from contractors for construction. (If you are a Neighborhood Housing Services client, you may work with their construction specialists to coordinate and choose between bids.) At minimum, you’ll want three bids for your conversion, from firms that provide reliable, conscientious, and timely work. From a permitting and inspection standpoint, selecting a reasonable bid (and reliable firm) should limit installation and inspection issues down the road. Contractor bids will look very much like the line-item estimates in ‘Building Equity.’ The section below outlines researching contractors, for guidance on making bid decisions with your architect.
selecting a contractor
As a client, you can avoid contractor issues through a combination of due diligence in researching, selecting, and contracting with a contractor based on their bids.
You should take the following steps to avoid problems:
- Ask the contractor for copies of the licenses they (and their subcontractors) hold. The City of Chicago requires General Contractor Licensing. Additionally, masons, electricians, plumbers, and roofers must have appropriate specialty licensing.
- Solicit bids from contractors with the right experience for the job. For example, a contractor that principally does new construction may not be right for your basement adaptation project. Your Architect should be able to recommend contractors with whom they’ve had similar, successful basement projects.
- Check that the contractor has proper insurance coverage. At Neighborhood Housing Services, they require any contractor working with clients to carry comprehensive liability insurance (protecting the Contractor and Homeowner) of no less than $1,000,000 and workers compensation insurance of > $100,000.
- Ask the contractor for references from three similar projects. Contact the references regarding their experience. If the project involves visible repairs (i.e., new terraces or significant structural repair), try to go see the completed work in person.
Check for complaints against contractors:
signing contracts with a general contractor
Just as when signing with an architect, your contract with a general contractor (and their team of licensed tradespeople) should be clear, in language you can understand, on exactly what work is to be done, when and how the payments will be made, and everything else you have agreed upon below. By law, you have 3 days to cancel the contract before it becomes binding.
Be sure to consider the following:
- The contract states the start and completion date for all work. The contract should say exactly how you know whether the work will be done properly and what will happen if the work is not completed on schedule.
- A good contractor bid or proposal should include the following items: a detailed scope of work; quantity (i.e., X number of windows); location; special conditions (i.e., reusing floorboards); installation methods; quality/material type; performance standard (i.e., product warranties on vapor barriers); cash allowances (for particular materials); and responsibilities of each party.
- All bids should be in writing and specific enough that you can see what each work item costs. This is called a line-item bid. If a contractor feels that additional repairs are needed for a project beyond what is requested (i.e., replacing the plumbing running to a bathroom that is to be rehabbed), then these should also be listed separately so you can evaluate their cost.
- Do not sign any estimate until you have done all necessary due diligence and selected the contractor you feel is best for the job. Do not pay for any estimates.
- Agree on the payment upfront. It is best to agree that you will pay the exact amount that includes all costs for the project rather than paying hourly.
- It is standard to make partial payments as the job is completed, either based on percentage of work completed (i.e., 20%, 40%) or at previously agreed upon milestones.
- If advance payment is needed to secure particular products or materials (i.e., windows), those payments should be made directly to the vendor, with purchases in your name.
construction administration
7 contractor preparation
Once you sign with a general contractor and have approved permits, your contractor will prepare for construction. This includes finalizing the overall schedule, specified in the bid documents, and setting up the construction site according to fire safety regulations and safe disposal practices, If any environmental hazards have been identified for removal, your contractor should notify all tenants of abatement work, with state-licensed abatement professionals to cleaning, clearing, and preparing the site for further construction work.
The ‘Mitigating Issues’ chapter of the manual provides more details on lead and asbestos abatement permits and procedures within Chicago.
8 construction amd inspections
Depending on your architect’s contract and their scope for construction administration, they may coordinate site visits, monitoring, and confirmation of construction progress. When problems arise, based on newly discovered conditions, you will contract with your architect (for an additional fee) to edit and amend drawings, seeking permit updates as necessary. During construction, you should reach out to both your architect and general contractor to keep you apprised of the general progression of work and make sure all required inspections are happening as scheduled. If you have a larger building (5 flats with the new unit) inspections schedules should be coordinated, with your contractor, through temporary ‘Certificate of Occupancy’ applications with the Department of Buildings.
Based on your contracts, you should receive periodic invoices for finished construction tasks or revised drawings. These costs should be covered by your loans/grants and built into overhead. Make sure to document all payments and the work more generally. It’s important to keep good records in case there are conflicts about material installation, ‘remove/rebuild’ inspection orders, and ongoing work.
The manual chapter ‘Navigating Permits’ lays out the specific documents and the process of applying for coordinating inspections with the Department of Buildings. The list of required inspections provides a sense of construction order for basement conversion. ‘Mitigating Issues’ should help you to discuss any revisions to design, based on information that arises during the construction process.
Once your building passes all inspections and the work is complete, you and your architect will do a walk through, with a ‘punch list,’ to inspect the project and highlight outstanding details to finish before.... drumroll....you get the keys to your brand new basement unit.
9 occupancy, unit management
Once construction is complete you should pay any outstanding invoices, finalize required ‘Occupancy Permits,’ and make sure your unit management plans are in order. This means refining rent estimates, photographing the unit for marketing (and as desired by the architect), and establishing any background banking accounts for tenant deposits, rental income, and out-going maintenance and management fees. Pulling building permits should trigger a property assessment, but it’s a good time to verify or apply for applicable tax and utility exemptions.
The manual’s ‘Building Equity’ chapter offers rough budgeting tools for apartment management tasks and links to a number of landlord resources.
10 occupancy, unit management
With accounts in place and, hopefully, a fresh array of trusted contacts in the building industry, it makes sense to address long-term maintenance for your building. This includes getting contracts for annual, preventative work (from trusted tradespeople) as well as getting estimates on existing fixtures and systems that were not updated during conversion. You should also refine your budget for saving reserves and rental income for building maintenance.
As noted above, see ‘Building Equity’ for maintenance budgeting tools and resources.
basement conversion projects: summary variations
The chart and ten steps described on the prior pages offer an overview of a mid-sized or large conversion project for a single family home into a Two-Flat. With costs between $160,000-180,000 total, you can expect about $20,000 in architectural fees (12%), and spending about $10,000 in advance of securing finalized estimates and loans.
A project of this size could take between seven month and one year, keeping in mind that exterior work like drains, utility service lines and new terraces/exits need to be scheduled around the Chicago winter. If you need to expedite any of the design or construction steps, that will raise overall project costs as it requires more labor. A smaller project could cost half this amount and take four to nine months (conservatively).
Proceed to the first chapter, ‘Common Conversions’ to explore common Chicago house types and how their characteristics affect potential basement units.